
2022年9月4日
Asciidocをさらに活用
目次: Linux
前回(2022年9月3日の日記参照)、Asciidocのプレビュー環境の設定方法を紹介(Chrome or VSCode)しました。今回はさらにAsciidocの便利機能とそのプレビューを使えるようにします。
ちなみにこのプレビュー機能はVSCode限定となります。Chromeでも使えると便利なんですけどね……。
asciidoctor-diagramで他のツールと連携
Asciidocにはasciidoctor-diagram extensionがあり、他のツール向けテキストを *.adoc内に記述すると、ツールと連携して自動的に画像を生成し、自動的に文書内に埋め込む機能があります。
例えばUMLをテキストで記述するPlatUMLと連携する場合は、
asciidoctor-diagramを使ってPlantUMLと連携
= Hello

== World

This is hello world.

[plantuml]
----
@startuml
A -> B : ccc
@enduml
----
このように [plantuml] の後にPlantUML向けのテキストを書きます。プレビューや他形式に変換した場合、PlantUMLのテキストの代わりにPlantUMLが出力した画像が表示されていることがわかると思います。
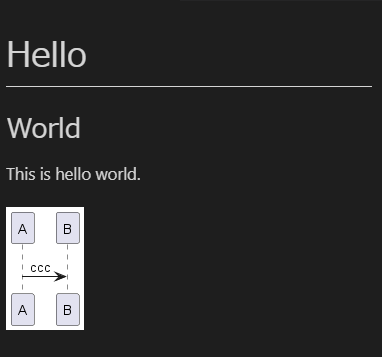
各ツールを起動して画像に変換&リネームしてAsciidocに画像表示の記述を書く方法と比べれば、利便性は天と地の差でしょう。
Rubyのインストール
AsciidoctorやextensionはRubyで実装されているため、Rubyをインストールする必要があります。
Rubyの公式サイト(サイトへのリンク)を見る限り、Windows向けインストールにはRubyInstallerツール(サイトへのリンク)がおススメのようです。
Rubyの起動確認
c:\app>ruby --version

ruby 3.1.2p20 (2022-04-12 revision 4491bb740a) [x64-mingw-ucrt]
RubyInstallerはPATHの設定も自動的に行います。インストール後、コマンドプロンプトを起動してrubyを起動できればインストール成功です。
asciidoctor-diagramのインストール
Rubyをインストールしたら、asciidoctor-diagramをインストールします。同時にasciidoctorもインストールされます。
asciidoctor-diagramのインストール
C:\app>gem install asciidoctor-diagram

Fetching asciidoctor-diagram-plantuml-1.2022.5.gem
Fetching asciidoctor-diagram-ditaamini-1.0.3.gem
Fetching asciidoctor-diagram-2.2.3.gem
Fetching asciidoctor-2.0.17.gem
Successfully installed asciidoctor-diagram-plantuml-1.2022.5
Successfully installed asciidoctor-diagram-ditaamini-1.0.3
Successfully installed asciidoctor-2.0.17
Successfully installed asciidoctor-diagram-2.2.3
Parsing documentation for asciidoctor-diagram-plantuml-1.2022.5
Installing ri documentation for asciidoctor-diagram-plantuml-1.2022.5
Parsing documentation for asciidoctor-diagram-ditaamini-1.0.3
Installing ri documentation for asciidoctor-diagram-ditaamini-1.0.3
Parsing documentation for asciidoctor-2.0.17
Installing ri documentation for asciidoctor-2.0.17
Parsing documentation for asciidoctor-diagram-2.2.3
Installing ri documentation for asciidoctor-diagram-2.2.3
Done installing documentation for asciidoctor-diagram-plantuml, asciidoctor-diagram-ditaamini, asciidoctor, asciidoctor-diagram after 4 seconds
4 gems installed
コマンドプロンプトからGemで一発インストール可能で便利です。asciidoctorはRubyのbinディレクトリの配下にスクリプトが配置されるようです。
asciidoctorの起動確認
c:\app>asciidoctor --version

Asciidoctor 2.0.17 [https://asciidoctor.org]
Runtime Environment (ruby 3.1.2p20 (2022-04-12 revision 4491bb740a) [x64-mingw-ucrt]) (lc:Windows-31J fs:UTF-8 in:UTF-8 ex:UTF-8)
インストール後、コマンドプロンプトからasciidoctorを起動できればインストール成功です。
Javaのインストール
今回はPlantUMLとの連携を試しますので、PlantUMLの環境も整えます。PlantUMLの実行にはJavaが必要です。
PlantUMLを実行するだけならJRE(Java Runtime Environment)で十分ですが、もし今後Java言語での開発を行う予定があれば、OpenJDKをインストールした方が良いです。私はJavaも使うので Oracle OpenJDKのダウンロードサイト からOpenJDKをダウンロードしました。現状の最新版は18.0.2.1でアーカイブのファイル名はopenjdk-18.0.2.1_windows-x64_bin.zipです。
ダウンロードしたzipファイルを展開すると、jdk-18.0.2.1のような名前のディレクトリがあるので適当な場所に移動(= インストールに相当)します。この際にディレクトリ名をリネームしても良いです。
JDKを適当な場所に配置したらPATHを設定します。例えばJDKをc:\app\jdkにインストールしたとすると、

こんな感じでPATHに追加します。
Javaの起動確認
c:\app>java -version

openjdk version "18.0.2.1" 2022-08-18
OpenJDK Runtime Environment (build 18.0.2.1+1-1)
OpenJDK 64-Bit Server VM (build 18.0.2.1+1-1, mixed mode, sharing)
PATH追加後、コマンドプロンプトからjavaを起動できればインストール成功です。
VSCodeの設定
VSCode側のプレビュー設定も変更する必要があります。
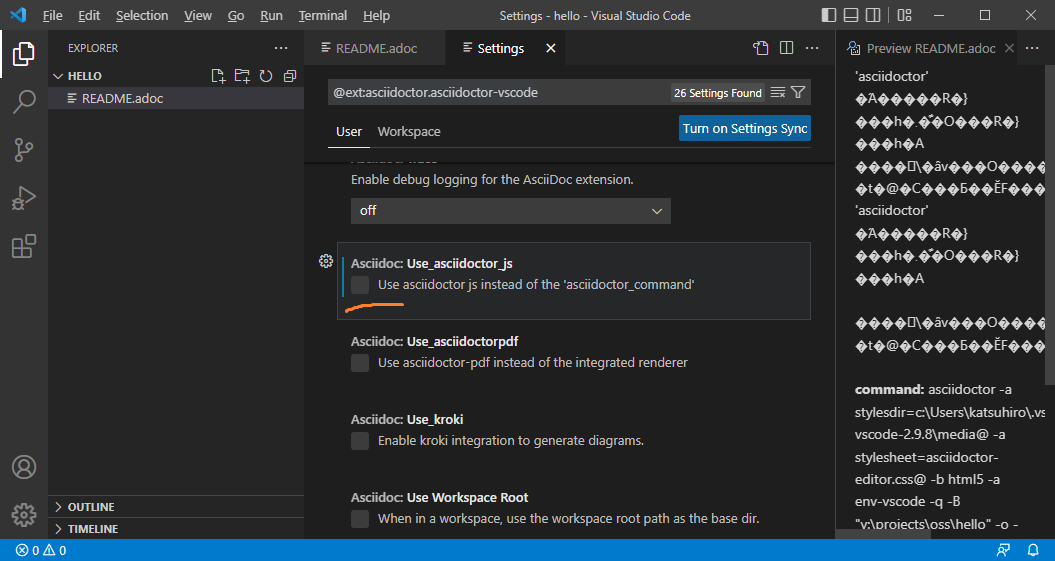
まずはAsciiDocの設定ページを開いてasciidoctor_jsによるプレビュー生成を無効化します。asciidoctor_jsはasciidoctor-diagramに対応していないからです。プレビュー画面がエラー表示になるかもしれませんが、気にしないでください。
次にasciidoctorがasciidoctor-diagramを使うように設定します。具体的には起動時のオプションに -r asciidoctor-diagramを追加します。
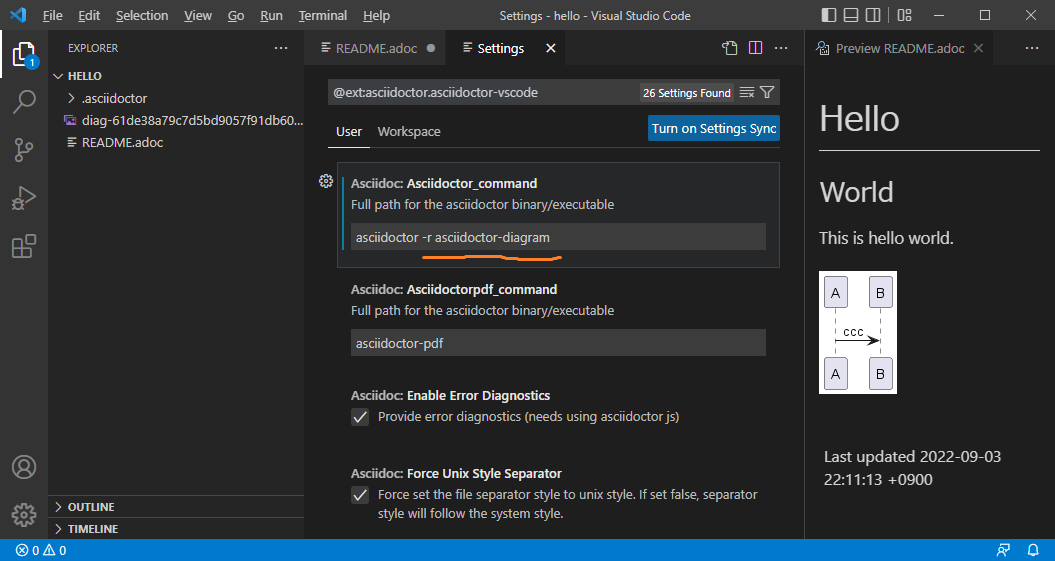
今までの設定がうまくいっているなら、プレビュー画面が更新されてPlantUMLのテキストの代わりにUMLの画像が表示されるはずです。
まとめ
手順として書いてみると思ったより長いですが、asciidoctor-diagramはなかなか便利です。描画ツールでUMLを書いて、画像にしてAsciidocに埋め込んで……みたいなウザい作業とはお別れです。
画像を使わずテキストで記述するので、差分取得も容易です。画像ファイルで往々にして発生する、原稿がどっか行って更新できなくなった、などのトラブルも防いでくれることでしょう。
コメント一覧
- コメントはありません。
 この記事にコメントする
| < | 2022 | > | ||||
| << | < | 09 | > | >> | ||
| 日 | 月 | 火 | 水 | 木 | 金 | 土 |
| - | - | - | - | 1 | 2 | 3 |
| 4 | 5 | 6 | 7 | 8 | 9 | 10 |
| 11 | 12 | 13 | 14 | 15 | 16 | 17 |
| 18 | 19 | 20 | 21 | 22 | 23 | 24 |
| 25 | 26 | 27 | 28 | 29 | 30 | - |
こんてんつ
wiki Linux JM Java API過去の日記
2002年 2003年 2004年 2005年 2006年 2007年 2008年 2009年 2010年 2011年 2012年 2013年 2014年 2015年 2016年 2017年 2018年 2019年 2020年 2021年 2022年 2023年 2024年 過去日記についてその他の情報
アクセス統計 サーバ一覧 サイトの情報
合計:
本日:
