2021年3月15日
GCCを調べる - memmoveのfoldingその3
目次: GCC
前回はmemmove() をmemcpy() に置き換える条件をチェックしているコードを紹介しました。より詳細に見ていきたいと思います。ここまで細かい話になると、もはや自分以外の誰得なのか全くわかりませんけど、そんなことを気にしてはいけません。
volatileの有無で何が変わるか?
前回紹介したチェック箇所のうちvolatileの有無で動きが変わるのは、下記のoperand_equal_p() です。
memmove置き換え前のチェック箇所
// gcc/gcc/gimple-fold.c

	      if (SSA_VAR_P (src_base)
		  && SSA_VAR_P (dest_base))    //★★この条件が成立する
		{
                  //★★volatileがあるとoperand_equal_p() がfalseを返し、
                  //★★memmoveがmemcpyに置き換えられてしまう
		  if (operand_equal_p (src_base, dest_base, 0)
		      && ranges_maybe_overlap_p (src_offset, maxsize,
						 dest_offset, maxsize))
		    return false;    //★★チェック1箇所目
		}


// gcc/gcc/fold-const.c

/* Return nonzero if two operands (typically of the same tree node)
   are necessarily equal. FLAGS modifies behavior as follows:

   If OEP_ONLY_CONST is set, only return nonzero for constants.
   This function tests whether the operands are indistinguishable;
   it does not test whether they are equal using C's == operation.
   The distinction is important for IEEE floating point, because
   (1) -0.0 and 0.0 are distinguishable, but -0.0==0.0, and
   (2) two NaNs may be indistinguishable, but NaN!=NaN.

   If OEP_ONLY_CONST is unset, a VAR_DECL is considered equal to itself
   even though it may hold multiple values during a function.
   This is because a GCC tree node guarantees that nothing else is
   executed between the evaluation of its "operands" (which may often
   be evaluated in arbitrary order).  Hence if the operands themselves
   don't side-effect, the VAR_DECLs, PARM_DECLs etc... must hold the
   same value in each operand/subexpression.  Hence leaving OEP_ONLY_CONST
   unset means assuming isochronic (or instantaneous) tree equivalence.
   Unless comparing arbitrary expression trees, such as from different
   statements, this flag can usually be left unset.

   If OEP_PURE_SAME is set, then pure functions with identical arguments
   are considered the same.  It is used when the caller has other ways
   to ensure that global memory is unchanged in between.

   If OEP_ADDRESS_OF is set, we are actually comparing addresses of objects,
   not values of expressions.

   If OEP_LEXICOGRAPHIC is set, then also handle expressions with side-effects
   such as MODIFY_EXPR, RETURN_EXPR, as well as STATEMENT_LISTs.

   If OEP_BITWISE is set, then require the values to be bitwise identical
   rather than simply numerically equal.  Do not take advantage of things
   like math-related flags or undefined behavior; only return true for
   values that are provably bitwise identical in all circumstances.

   Unless OEP_MATCH_SIDE_EFFECTS is set, the function returns false on
   any operand with side effect.  This is unnecesarily conservative in the
   case we know that arg0 and arg1 are in disjoint code paths (such as in
   ?: operator).  In addition OEP_MATCH_SIDE_EFFECTS is used when comparing
   addresses with TREE_CONSTANT flag set so we know that &var == &var
   even if var is volatile.  */

bool
operand_compare::operand_equal_p (const_tree arg0, const_tree arg1,
				  unsigned int flags)
{
  bool r;
  if (verify_hash_value (arg0, arg1, flags, &r))
    return r;

...

  /* If ARG0 and ARG1 are the same SAVE_EXPR, they are necessarily equal.
     We don't care about side effects in that case because the SAVE_EXPR
     takes care of that for us. In all other cases, two expressions are
     equal if they have no side effects.  If we have two identical
     expressions with side effects that should be treated the same due
     to the only side effects being identical SAVE_EXPR's, that will
     be detected in the recursive calls below.
     If we are taking an invariant address of two identical objects
     they are necessarily equal as well.  */
  if (arg0 == arg1 && ! (flags & OEP_ONLY_CONST)
      && (TREE_CODE (arg0) == SAVE_EXPR
	  || (flags & OEP_MATCH_SIDE_EFFECTS)
	  || (! TREE_SIDE_EFFECTS (arg0) && ! TREE_SIDE_EFFECTS (arg1))))
    return true;  //★★volatileがないときは、このチェックに引っかかるが、volatileがあると引っかからない

...
変化する箇所を見つけましたので、条件を全部バラしてvolatileの有無でどの条件が変化するか調べます。GCCはこういう訳のわからないif文を連発してくるため、非常に解析が大変です……。
volatileの有無で変化する条件を調べる
// ★★下記のように条件を全て展開して差分を調べる

int a, b, c, d, e, f, g;

a = arg0 == arg1;
b = ! (flags & OEP_ONLY_CONST);
c = TREE_CODE (arg0) == SAVE_EXPR;
d = flags & OEP_MATCH_SIDE_EFFECTS;
e = ! TREE_SIDE_EFFECTS (arg0);    //★★この条件が変わる
f = ! TREE_SIDE_EFFECTS (arg1);    //★★この条件が変わる
g = ppa && ppb && (ppc || ppd || (ppe && ppf));

/*
 * volatileなし
 *   (a, b, c, d, e, f, g)
 *   (1, 1, 0, 0, 1, 1, 1)
 * volatileあり
 *   (a, b, c, d, e, f, g)
 *   (1, 1, 0, 0, 0, 0, 0)
 *
 * volatileありのときはside_effects_flagが1になる。
 */


// gcc/gcc/tree.h

/* In any expression, decl, or constant, nonzero means it has side effects or
   reevaluation of the whole expression could produce a different value.
   This is set if any subexpression is a function call, a side effect or a
   reference to a volatile variable.  In a ..._DECL, this is set only if the
   declaration said `volatile'.  This will never be set for a constant.  */
#define TREE_SIDE_EFFECTS(NODE) \
  (NON_TYPE_CHECK (NODE)->base.side_effects_flag)


//★★参考: side_effects_flagを設定する場所
// gcc/gcc/c-family/c-common.c

/* Apply the TYPE_QUALS to the new DECL.  */

void
c_apply_type_quals_to_decl (int type_quals, tree decl)
{
  tree type = TREE_TYPE (decl);

  if (type == error_mark_node)
    return;

  if ((type_quals & TYPE_QUAL_CONST)
      || (type && TREE_CODE (type) == REFERENCE_TYPE))
    /* We used to check TYPE_NEEDS_CONSTRUCTING here, but now a constexpr
       constructor can produce constant init, so rely on cp_finish_decl to
       clear TREE_READONLY if the variable has non-constant init.  */
    TREE_READONLY (decl) = 1;
  if (type_quals & TYPE_QUAL_VOLATILE)
    {
      TREE_SIDE_EFFECTS (decl) = 1;    //★★ここで設定する
      TREE_THIS_VOLATILE (decl) = 1;
    }
  if (type_quals & TYPE_QUAL_RESTRICT)
    {
      while (type && TREE_CODE (type) == ARRAY_TYPE)
	/* Allow 'restrict' on arrays of pointers.
	   FIXME currently we just ignore it.  */
	type = TREE_TYPE (type);
      if (!type
	  || !POINTER_TYPE_P (type)
	  || !C_TYPE_OBJECT_OR_INCOMPLETE_P (TREE_TYPE (type)))
	error ("invalid use of %<restrict%>");
    }
}
もしsrcやdestにvolatile修飾子が付いていると、side_effects_flagがセットされます。このフラグがセットされていると、GCCはアドレスをチェックすることなく、問答無用でsrcとdestは「等しくない」と判断します。その結果srcとdestは重なっていないことになって、memmove() をmemcpy() に置き換える最適化が働きます。
正直な感想としてはGCCバグってるだろ……と思いますが、volatile変数はいつ書き換わってもおかしくないので、memmove() をmemcpy() に置き換えて、動作がおかしくなっても規格違反にはならない?うーん、良くわかりませんね。
ちなみにClang/LLVMはこのような最適化は行いません。memmove() はmemmove() の呼び出しのままです。
x86_64環境の事情
さらに厄介なことにx86_64のglibcはmemmove() を呼ぶべき場面でmemcpy() を呼んでも、正常に動いてしまいます。検証用のプログラムを下記のように変えます。
重複したメモリ領域にmemcpy() するプログラム
#include <stdio.h>
#include <string.h>

#define PRE "AB"
#define STR "0123456789abcdefg"
#define NOP __asm__ volatile("nop;")

int main(int argc, char *argv[])
{
	volatile char s[] = PRE STR;
	char *p = (char *)s;
	size_t sz_pre = strlen(PRE);
	size_t sz = strlen(p) - sz_pre + 1;

	NOP;
	memcpy(p, p + sz_pre, sz);
	NOP; NOP;

	if (strcmp(p, STR) == 0) {
		printf("  OK: %s\n", p);
	} else {
		printf("  NG: %s\n", p);
	}
}
オプション -fno-builtinを指定すると、GCCがmemcpy() をアセンブラへ展開しようとする最適化を抑制することができます。
重複したメモリ領域にmemcpy() するプログラムの実行結果
$ gcc -O2 -Wall -g test.c -fno-builtin

$ objdump -drS a.out

...

        NOP;
    10b7:       90                      nop
        size_t sz = strlen(p) - sz_pre + 1;
    10b8:       48 83 c2 01             add    $0x1,%rdx
        memcpy(p, p + sz_pre, sz);
    10bc:       48 8d 74 1d 00          lea    0x0(%rbp,%rbx,1),%rsi
    10c1:       48 89 ef                mov    %rbp,%rdi
        size_t sz = strlen(p) - sz_pre + 1;
    10c4:       48 29 da                sub    %rbx,%rdx
        memcpy(p, p + sz_pre, sz);
    10c7:       e8 94 ff ff ff          callq  1060 <memcpy@plt>    ;★★memcpyを呼んでいる
        NOP; NOP;
    10cc:       90                      nop
    10cd:       90                      nop


$ ./a.out

  OK: 0123456789abcdefg
この動作でもC言語仕様に違反するわけではありません。しかしGCCが間違ってmemmove() をmemcpy() に置き換えるようなバグがあったときに、意図せず隠蔽してしまいます。ありがたいような、ありがたくないような実装ですね。
コメント一覧
- コメントはありません。
 この記事にコメントする
2021年3月14日
GCCを調べる - memmoveのfoldingその2
目次: GCC
前回はmemmove() が030t.ccp1という最適化パスにて __builtin_memcpy() に置き換えられ、誤動作してしまうところまで見ました。今回はどこで置き換えられているのか、追いかけます。
入れ替えを行っている場所はgimple_fold_builtin_memory_op() という関数です。コールスタックは下記のようになります。今回はGCC 11というかHEADを使います。関数名は若干違いますがGCC 8くらいでも大筋は同じです。
memmove置き換え箇所までのコールスタック
do_ssa_ccp()  @tree-ssa-ccp.c
  ccp_finalize()
    substitute_and_fold_engine::substitute_and_fold()  @tree-ssa-propagate.c
      substitute_and_fold_dom_walker walker (CDI_DOMINATORS, this);
      walker.walk (ENTRY_BLOCK_PTR_FOR_FN (cfun));
        dom_walker::walk()  @domwalk.c
          substitute_and_fold_dom_walker::before_dom_children()  @tree-ssa-propagate.c
            fold_stmt()  @gimple-fold.c
              fold_stmt_1()  @gimple-fold.c
                gimple_fold_call()
                  gimple_fold_builtin()
                    gimple_fold_builtin_memory_op()
置き換えている箇所はgimple_fold_builtin_memory_op() 内に3箇所ありますが、今回のケースに該当するのは下記の部分です。
memmove置き換え箇所
// gcc/gcc/gimple-fold.c

static bool
gimple_fold_builtin_memory_op (gimple_stmt_iterator *gsi,
			       tree dest, tree src, enum built_in_function code)
{
  gimple *stmt = gsi_stmt (*gsi);
  tree lhs = gimple_call_lhs (stmt);
  tree len = gimple_call_arg (stmt, 2);
  location_t loc = gimple_location (stmt);

...

      if (code == BUILT_IN_MEMMOVE)
	{

...

	  /* If *src and *dest can't overlap, optimize into memcpy as well.  */
	  if (TREE_CODE (src) == ADDR_EXPR
	      && TREE_CODE (dest) == ADDR_EXPR)
	    {

              //...ここでチェックしている...

	      fn = builtin_decl_implicit (BUILT_IN_MEMCPY);
	      if (!fn)
		return false;
	      gimple_call_set_fndecl (stmt, fn);    //★★ここでmemmove -> memcpyに置き換わる
	      gimple_call_set_arg (stmt, 0, dest);
	      gimple_call_set_arg (stmt, 1, src);
	      fold_stmt (gsi);
	      return true;
	    }

...

/*
 * 補足: gimple * の中身が見たいときは、下記のようにすると表示できます。
 *
 *   print_gimple_stmt (stdout, stmt, 0);       //HEAD
 *   print_gimple_stmt (stdout, stmt, 0, 0);    //GCC 8あたり
 */
検証プログラムはmemmove() の引数にポインタを渡しているので、TREE_CODE (src) == ADDR_EXPR && TREE_CODE (dest) == ADDR_EXPRの条件が成立します。
置き換えの前にはいくつかチェックがあって、memmove() をmemcpy() に置き換えるべきではないと判断したらreturn false; し、置き換え箇所に到達しない仕組みになっています。
memmove置き換え前のチェック箇所
// gcc/gcc/gimple-fold.c

	  /* If *src and *dest can't overlap, optimize into memcpy as well.  */
	  if (TREE_CODE (src) == ADDR_EXPR
	      && TREE_CODE (dest) == ADDR_EXPR)
	    {
	      tree src_base, dest_base, fn;
	      poly_int64 src_offset = 0, dest_offset = 0;
	      poly_uint64 maxsize;

              //★★src->expr.operands[0] を返す、srcvarはMEM_REFタイプ
	      srcvar = TREE_OPERAND (src, 0);
              //★★src_baseはVAR_DECLタイプ
              //★★src_offsetは2(検証用プログラムでmemmoveのsrcにs + 2を渡しているから)
	      src_base = get_addr_base_and_unit_offset (srcvar, &src_offset);
	      if (src_base == NULL)
		src_base = srcvar;

              //★★dest->expr.operands[0] を返す、destvarはMEM_REFタイプ
	      destvar = TREE_OPERAND (dest, 0);
              //★★dest_baseはVAR_DECLタイプ
              //★★dest_offsetは0(検証用プログラムでdestにsを渡しているから)
	      dest_base = get_addr_base_and_unit_offset (destvar,
							 &dest_offset);
	      if (dest_base == NULL)
		dest_base = destvar;
	      if (!poly_int_tree_p (len, &maxsize))
		maxsize = -1;
	      if (SSA_VAR_P (src_base)
		  && SSA_VAR_P (dest_base))    //★★この条件が成立する
		{
                  //★★volatileがあるとoperand_equal_p() がfalseになり
                  //★★memmoveがmemcpyに置き換えられてしまう
		  if (operand_equal_p (src_base, dest_base, 0)
		      && ranges_maybe_overlap_p (src_offset, maxsize,
						 dest_offset, maxsize))
		    return false;    //★★チェック1箇所目
		}
	      else if (TREE_CODE (src_base) == MEM_REF
		       && TREE_CODE (dest_base) == MEM_REF)
		{
		  if (! operand_equal_p (TREE_OPERAND (src_base, 0),
					 TREE_OPERAND (dest_base, 0), 0))
		    return false;
		  poly_offset_int full_src_offset
		    = mem_ref_offset (src_base) + src_offset;
		  poly_offset_int full_dest_offset
		    = mem_ref_offset (dest_base) + dest_offset;
		  if (ranges_maybe_overlap_p (full_src_offset, maxsize,
					      full_dest_offset, maxsize))
		    return false;    //★★チェック2箇所目
		}
	      else
		return false;    //★★チェック3箇所目

	      fn = builtin_decl_implicit (BUILT_IN_MEMCPY);
	      if (!fn)
		return false;
	      gimple_call_set_fndecl (stmt, fn);    //★★ここでmemmove -> memcpyに置き換わる
	      gimple_call_set_arg (stmt, 0, dest);
	      gimple_call_set_arg (stmt, 1, src);
	      fold_stmt (gsi);
	      return true;
...


// gcc/gcc/tree-dfa.c

/* Returns the base object and a constant BITS_PER_UNIT offset in *POFFSET that
   denotes the starting address of the memory access EXP.
   Returns NULL_TREE if the offset is not constant or any component
   is not BITS_PER_UNIT-aligned.  */

tree
get_addr_base_and_unit_offset (tree exp, poly_int64_pod *poffset)
{
  return get_addr_base_and_unit_offset_1 (exp, poffset, NULL);
}


/* Returns the base object and a constant BITS_PER_UNIT offset in *POFFSET that
   denotes the starting address of the memory access EXP.
   Returns NULL_TREE if the offset is not constant or any component
   is not BITS_PER_UNIT-aligned.
   VALUEIZE if non-NULL is used to valueize SSA names.  It should return
   its argument or a constant if the argument is known to be constant.  */

tree
get_addr_base_and_unit_offset_1 (tree exp, poly_int64_pod *poffset,
				 tree (*valueize) (tree))
{
  poly_int64 byte_offset = 0;

  /* Compute cumulative byte-offset for nested component-refs and array-refs,
     and find the ultimate containing object.  */
  while (1)
    {
      switch (TREE_CODE (exp))
	{

...

	case MEM_REF:
	  {
	    tree base = TREE_OPERAND (exp, 0);
	    if (valueize
		&& TREE_CODE (base) == SSA_NAME)
	      base = (*valueize) (base);

	    /* Hand back the decl for MEM[&decl, off].  */
	    if (TREE_CODE (base) == ADDR_EXPR)
	      {
		if (!integer_zerop (TREE_OPERAND (exp, 1)))
		  {
		    poly_offset_int off = mem_ref_offset (exp);
		    byte_offset += off.force_shwi ();
		  }
		exp = TREE_OPERAND (base, 0);
	      }
	    goto done;
	  }


// gcc/gcc/tree.h

#define SSA_VAR_P(DECL)							\
	(TREE_CODE (DECL) == VAR_DECL					\
	 || TREE_CODE (DECL) == PARM_DECL				\
	 || TREE_CODE (DECL) == RESULT_DECL				\
	 || TREE_CODE (DECL) == SSA_NAME)
領域が重複している場合は、1箇所目のチェックに引っかかります。不思議なことに、配列sの宣言からvolatileを外して動かすと、1箇所目のチェックに引っかかりますが、volatileを付けるとチェックに引っかからなくなります。
検証用のコード(部分、再掲)
int main(int argc, char *argv[])
{
	volatile char s[] = PRE STR;    //★★volatileを外すと __builtin_memcpy() への置き換えが発生しなくなる
	char *p = (char *)s;
	size_t sz_pre = strlen(PRE);
	size_t sz = strlen(p) - sz_pre + 1;
本来はvolatileがあろうがなかろうが1箇所目のチェックに引っかからないとおかしいですが、volatileがあるときは、なぜか1箇所目のチェックを通過してしまいます。
長くなってきたので、続きはまた次回。
コメント一覧
- コメントはありません。
 この記事にコメントする
2021年3月13日
GCCを調べる - memmoveのfoldingその1
目次: GCC
GCCのmemmoveに対する最適化とバグっぽい挙動についてのメモです。半年経ったら絶対忘れてわからなくなる自信があるので、書き残しておきます。
検証に使用するのは下記のプログラムです。"AB0123456789abcdefg" が格納された配列sから、同じ配列sに2文字だけずらしてmemmove() します。期待値は先頭2文字が消えた "0123456789abcdefg" です。このプログラムはmemmove() を使う必要があります。memcpy() はコピー元(src)とコピー先(dst)が重複したメモリ領域だと正常に動作しないことがあるからです。
重複したメモリ領域にmemmove() するプログラム
#include <stdio.h>
#include <string.h>

#define PRE "AB"
#define STR "0123456789abcdefg"
#define NOP __asm__ volatile("nop;")

int main(int argc, char *argv[])
{
	volatile char s[] = PRE STR;
	char *p = (char *)s;
	size_t sz_pre = strlen(PRE);
	size_t sz = strlen(p) - sz_pre + 1;

	NOP;
	memmove(p, p + sz_pre, sz);
	NOP; NOP;

	if (strcmp(p, STR) == 0) {
		printf("  OK: %s\n", p);
	} else {
		printf("  NG: %s\n", p);
	}
}
実行結果
$ gcc -O2 -Wall -g test.c

$ ./a.out
  NG: 01234567abcdefg
しかし、実行してみると期待値と一致しません。真ん中の "89" がどこかに消えました。また配列sの宣言からvolatileを削除すると、正常に動作するようになります。一体、何が起きているのでしょうか?
GCCのアグレッシブな最適化
GCCはある条件下でmemmove() を __builtin_memcpy() に置き換えるという最適化を行います。その様子を観察するために、オプション --dump-tree-allを付けて、GIMPLEのファイルを出力します。
GIMPLEを調べる
$ gcc -O2 -Wall -g test.c --dump-tree-all

$ grep -r 'memmove ' ./ | sort

./test.c.004t.original:  memmove ((void *) p, (const void *) (p + (sizetype) sz_pre), sz);
./test.c.005t.gimple:    memmove (p, _3, sz);
./test.c.007t.omplower:    memmove (p, _3, sz);
./test.c.008t.lower:  memmove (p, _3, sz);
./test.c.011t.eh:  memmove (p, _3, sz);
./test.c.013t.cfg:  memmove (p, _3, sz);
./test.c.015t.ompexp:  memmove (p, _3, sz);
./test.c.020t.fixup_cfg1:  memmove (p, _3, sz);
./test.c.021t.ssa:  memmove (p_8, _3, sz_10);
./test.c.023t.nothrow:  memmove (p_8, _3, sz_10);
./test.c.025t.fixup_cfg2:  memmove (p_8, _3, sz_10);
./test.c.026t.local-fnsummary1:  memmove (p_8, _3, sz_10);
./test.c.027t.einline:  memmove (p_8, _3, sz_10);
./test.c.028t.early_optimizations:  memmove (p_8, _3, sz_10);
./test.c.029t.objsz1:  memmove (p_8, _3, sz_10);
ファイルをmemmoveで検索すると、029t.objsz1を最後に出現しなくなっています。029t.objsz1の次である030t.cpp1を見て、memmoveがどうなったのか確かめます。
030t.ccp1
// test.c.030t.ccp1

;; Function main (main, funcdef_no=11, decl_uid=2555, cgraph_uid=12, symbol_order=11)

main (int argc, char * * argv)
{

...

  __asm__ __volatile__("nop;");
  # DEBUG BEGIN_STMT
  __builtin_memcpy (&s, &MEM <volatile char[20]> [(void *)&s + 2B], sz_10);
  # DEBUG BEGIN_STMT
  __asm__ __volatile__("nop;");
  # DEBUG BEGIN_STMT
  __asm__ __volatile__("nop;");

...
検証用プログラムではmemmoveと書いたはずの場所が、__builtin_memcpy() に変わっています。この __builtin_memcpy() は最終的にアセンブラに展開されます。あまり詳しく追っていませんが、末尾の余りバイトをコピーしてから、先頭から8バイトずつコピーするループが実行されるようで、srcとdestが重なっていると、正常に動作しません。
逆アセンブル
$ objdump -drS a.out

...

        NOP;
    1084:       90                      nop
        size_t sz = strlen(p) - sz_pre + 1;
    1085:       48 8d 50 ff             lea    -0x1(%rax),%rdx
        memmove(p, p + sz_pre, sz);
    1089:       48 8d 4c 24 02          lea    0x2(%rsp),%rcx
    108e:       48 83 fa 08             cmp    $0x8,%rdx
    1092:       73 52                   jae    10e6 <main+0x86>    ★コピーするコードの本体
    1094:       f6 c2 04                test   $0x4,%dl
    1097:       0f 85 85 00 00 00       jne    1122 <main+0xc2>
    109d:       48 85 d2                test   %rdx,%rdx
    10a0:       74 0f                   je     10b1 <main+0x51>
    10a2:       0f b6 01                movzbl (%rcx),%eax
    10a5:       88 45 00                mov    %al,0x0(%rbp)
    10a8:       f6 c2 02                test   $0x2,%dl
    10ab:       0f 85 80 00 00 00       jne    1131 <main+0xd1>
        NOP; NOP;
    10b1:       90                      nop
    10b2:       90                      nop

...

        memmove(p, p + sz_pre, sz);
    10e6:       48 8b 74 14 fa          mov    -0x6(%rsp,%rdx,1),%rsi
    10eb:       48 83 e8 02             sub    $0x2,%rax
    10ef:       48 89 74 14 f8          mov    %rsi,-0x8(%rsp,%rdx,1)
    10f4:       48 83 f8 08             cmp    $0x8,%rax
    10f8:       72 b7                   jb     10b1 <main+0x51>
    10fa:       48 83 e0 f8             and    $0xfffffffffffffff8,%rax
    10fe:       31 d2                   xor    %edx,%edx
    1100:       48 8b 34 11             mov    (%rcx,%rdx,1),%rsi      ★この辺りがコピーのためのループ
    1104:       48 89 74 15 00          mov    %rsi,0x0(%rbp,%rdx,1)
    1109:       48 83 c2 08             add    $0x8,%rdx
    110d:       48 39 c2                cmp    %rax,%rdx
    1110:       72 ee                   jb     1100 <main+0xa0>
    1112:       eb 9d                   jmp    10b1 <main+0x51>
                printf("  OK: %s\n", p);
    1114:       48 8d 3d fb 0e 00 00    lea    0xefb(%rip),%rdi        # 2016 <_IO_stdin_used+0x16>
    111b:       e8 20 ff ff ff          callq  1040 <printf@plt>
    1120:       eb bc                   jmp    10de <main+0x7e>
        memmove(p, p + sz_pre, sz);
    1122:       8b 01                   mov    (%rcx),%eax
    1124:       89 45 00                mov    %eax,0x0(%rbp)
    1127:       8b 44 11 fc             mov    -0x4(%rcx,%rdx,1),%eax
    112b:       89 44 15 fc             mov    %eax,-0x4(%rbp,%rdx,1)
    112f:       eb 80                   jmp    10b1 <main+0x51>
    1131:       0f b7 44 11 fe          movzwl -0x2(%rcx,%rdx,1),%eax
    1136:       66 89 44 15 fe          mov    %ax,-0x2(%rbp,%rdx,1)
    113b:       e9 71 ff ff ff          jmpq   10b1 <main+0x51>
長くなってきたので、また次回。
コメント一覧
- emkさん(2024/03/05 12:44)
キャストでvolatileを外してアクセスしている時点で未定義動作なので、その後の調査には何の意味もありませんね。GCCではなくこのプログラムがバグっているだけです。 - すずきさん(2024/03/05 15:13)
あー、このプログラムがまずいんですね。ご指摘ありがとうございます。
 この記事にコメントする
2021年3月12日
浮動小数点数の丸め方
目次: C言語とlibc
C言語の規格では浮動小数点の丸めモードが4つ定義されています。実行中に変更することができ、fesetround() 関数で指定します。
ついUPWARD = 切り上げ、DOWNWARD = 切り捨て、と説明したくなりますが、TOWARDZEROと区別が付きませんし、正の数はまだしも、負の数を考えたとき混乱します。やや意味はわかりにくいですが、誤解のない説明をすると、こんな感じです。
- FE_DOWNWARD
- マイナス無限大方向への丸め、-11.5, -10.5, 10.5, 11.5を整数にすると、-12, -11, 10, 11
- FE_TONEAREST
- 最も近い数への丸め
- FE_TOWARDZERO
- ゼロ方向への丸め、-11.5, -10.5, 10.5, 11.5を整数にすると、-11, -10, 10, 11
- FE_UPWARD
- プラス無限大方向への丸め、-11.5, -10.5, 10.5, 11.5を整数にすると、-11, -10, 11, 12
DOWNWARD, TOWARDZERO, UPWARDは他に解釈の余地がありませんが、TONEARESTはど真ん中の数が来たときに、扱いに困ります。IEEE 754では2つの方式が定義されているようです。
- ties to even
- 偶数方向に丸める、10.5, 11.5を整数にすると10.0, 12.0になる
- ties away from zero
- ゼロから遠い方に丸める、10.5, 11.5を整数にすると11.0, 12.0になる、四捨五入に近い
説明するより実際に動かしたほうがわかりやすいでしょう。
丸めモードを実感
丸めモードの動作を確認するプログラムを書きます。8388610という数値はfloatの仮数部24bitを使い切った値となっています。1.0の増減は表現できますが、1.0より小さい値の増減はビットが足りないので表せないです。
8388610に対し1.0より小さい値(今回は0.25, 0.5, 0.75の3つを選びました)を加減算すれば、結果を正確に表現できないので、必ず丸め処理が行われます。丸めモードによる演算結果の違いを見るには丁度よいですね。
浮動小数点の丸めモードの動作を確認するプログラム
#include <stdio.h>
#include <fenv.h>
#include <float.h>

#define BASE_EVEN    8388610.0
#define BASE_ODD     8388611.0

union n_f {
	int n;
	float f;
};

static inline void test(void)
{
	union n_f a, b, c;

	a.f = BASE_EVEN;
	b.f = 0.25;
	c.f = a.f + b.f;
	printf("   %.2f+%.2f =  %.2f 0x%08x\n", a.f, b.f, c.f, c.n);
	b.f = 0.5;
	c.f = a.f + b.f;
	printf("   %.2f+%.2f =  %.2f 0x%08x\n", a.f, b.f, c.f, c.n);
	b.f = 0.75;
	c.f = a.f + b.f;
	printf("   %.2f+%.2f =  %.2f 0x%08x\n", a.f, b.f, c.f, c.n);

	a.f = BASE_ODD;
	b.f = 0.25;
	c.f = a.f + b.f;
	printf("   %.2f+%.2f =  %.2f 0x%08x\n", a.f, b.f, c.f, c.n);
	b.f = 0.5;
	c.f = a.f + b.f;
	printf("   %.2f+%.2f =  %.2f 0x%08x\n", a.f, b.f, c.f, c.n);
	b.f = 0.75;
	c.f = a.f + b.f;
	printf("   %.2f+%.2f =  %.2f 0x%08x\n", a.f, b.f, c.f, c.n);

	a.f = -BASE_EVEN;
	b.f = 0.25;
	c.f = a.f - b.f;
	printf("  %.2f-%.2f = %.2f 0x%08x\n", a.f, b.f, c.f, c.n);
	b.f = 0.5;
	c.f = a.f - b.f;
	printf("  %.2f-%.2f = %.2f 0x%08x\n", a.f, b.f, c.f, c.n);
	b.f = 0.75;
	c.f = a.f - b.f;
	printf("  %.2f-%.2f = %.2f 0x%08x\n", a.f, b.f, c.f, c.n);

	a.f = -BASE_ODD;
	b.f = 0.25;
	c.f = a.f - b.f;
	printf("  %.2f-%.2f = %.2f 0x%08x\n", a.f, b.f, c.f, c.n);
	b.f = 0.5;
	c.f = a.f - b.f;
	printf("  %.2f-%.2f = %.2f 0x%08x\n", a.f, b.f, c.f, c.n);
	b.f = 0.75;
	c.f = a.f - b.f;
	printf("  %.2f-%.2f = %.2f 0x%08x\n", a.f, b.f, c.f, c.n);
}

int main(int argc, char *argv[])
{
	printf("DOWNWARD\n");
	fesetround(FE_DOWNWARD);
	test();

	printf("TONEAREST\n");
	fesetround(FE_TONEAREST);
	test();

	printf("TOWARDZERO\n");
	fesetround(FE_TOWARDZERO);
	test();

	printf("UPWARD\n");
	fesetround(FE_UPWARD);
	test();

	return 0;
}
ところが、コンパイルして実行すると奇妙な結果が得られます。全てTONEARESTと同じ結果になってしまいます。
rounding-mathなし
$ gcc -Wall -g -O2 a.c -lm

$ ./a.out

DOWNWARD
   8388610.00+0.25 =  8388610.00 0x4b000002    ★TONEARESTと同じになっている
   8388610.00+0.50 =  8388610.00 0x4b000002
   8388610.00+0.75 =  8388611.00 0x4b000003
   8388611.00+0.25 =  8388611.00 0x4b000003
   8388611.00+0.50 =  8388612.00 0x4b000004
   8388611.00+0.75 =  8388612.00 0x4b000004
  -8388610.00-0.25 = -8388610.00 0xcb000002
  -8388610.00-0.50 = -8388610.00 0xcb000002
  -8388610.00-0.75 = -8388611.00 0xcb000003
  -8388611.00-0.25 = -8388611.00 0xcb000003
  -8388611.00-0.50 = -8388612.00 0xcb000004
  -8388611.00-0.75 = -8388612.00 0xcb000004
TONEAREST
   8388610.00+0.25 =  8388610.00 0x4b000002
   8388610.00+0.50 =  8388610.00 0x4b000002
   8388610.00+0.75 =  8388611.00 0x4b000003
   8388611.00+0.25 =  8388611.00 0x4b000003
   8388611.00+0.50 =  8388612.00 0x4b000004
   8388611.00+0.75 =  8388612.00 0x4b000004
  -8388610.00-0.25 = -8388610.00 0xcb000002
  -8388610.00-0.50 = -8388610.00 0xcb000002
  -8388610.00-0.75 = -8388611.00 0xcb000003
  -8388611.00-0.25 = -8388611.00 0xcb000003
  -8388611.00-0.50 = -8388612.00 0xcb000004
  -8388611.00-0.75 = -8388612.00 0xcb000004
TOWARDZERO
   8388610.00+0.25 =  8388610.00 0x4b000002    ★TONEARESTと同じになっている
   8388610.00+0.50 =  8388610.00 0x4b000002
   8388610.00+0.75 =  8388611.00 0x4b000003
   8388611.00+0.25 =  8388611.00 0x4b000003
   8388611.00+0.50 =  8388612.00 0x4b000004
   8388611.00+0.75 =  8388612.00 0x4b000004
  -8388610.00-0.25 = -8388610.00 0xcb000002
  -8388610.00-0.50 = -8388610.00 0xcb000002
  -8388610.00-0.75 = -8388611.00 0xcb000003
  -8388611.00-0.25 = -8388611.00 0xcb000003
  -8388611.00-0.50 = -8388612.00 0xcb000004
  -8388611.00-0.75 = -8388612.00 0xcb000004
UPWARD
   8388610.00+0.25 =  8388610.00 0x4b000002    ★TONEARESTと同じになっている
   8388610.00+0.50 =  8388610.00 0x4b000002
   8388610.00+0.75 =  8388611.00 0x4b000003
   8388611.00+0.25 =  8388611.00 0x4b000003
   8388611.00+0.50 =  8388612.00 0x4b000004
   8388611.00+0.75 =  8388612.00 0x4b000004
  -8388610.00-0.25 = -8388610.00 0xcb000002
  -8388610.00-0.50 = -8388610.00 0xcb000002
  -8388610.00-0.75 = -8388611.00 0xcb000003
  -8388611.00-0.25 = -8388611.00 0xcb000003
  -8388611.00-0.50 = -8388612.00 0xcb000004
  -8388611.00-0.75 = -8388612.00 0xcb000004
これはGCCの最適化による影響です。O1以上の最適化を行うと、演算時の丸めモードをTONEARESTと仮定し、コンパイル時に計算できる値を事前に計算する、という最適化が行われます。
この最適化が都合が良い場合もありますが、今回のようなプログラムでは丸めモードをTONEAREST以外に変更しているので、勝手にTONEARESTを仮定してはいけません。GCCの場合-frounding-mathというオプションを付けると、デフォルトの丸めモードを仮定した最適化をやめることができます。
rounding-mathあり
$ gcc -Wall -g -O2 a.c -lm -frounding-math

$ ./a.out

DOWNWARD    ★マイナス無限大方向に丸める
   8388610.00+0.25 =  8388610.00 0x4b000002    ★10.25 ->  10.00
   8388610.00+0.50 =  8388610.00 0x4b000002    ★10.50 ->  10.00
   8388610.00+0.75 =  8388610.00 0x4b000002    ★10.75 ->  10.00
   8388611.00+0.25 =  8388611.00 0x4b000003    ★11.25 ->  11.00
   8388611.00+0.50 =  8388611.00 0x4b000003    ★11.50 ->  11.00
   8388611.00+0.75 =  8388611.00 0x4b000003    ★11.75 ->  11.00
  -8388610.00-0.25 = -8388611.00 0xcb000003    ★-10.25 -> -11.00
  -8388610.00-0.50 = -8388611.00 0xcb000003    ★-10.50 -> -11.00
  -8388610.00-0.75 = -8388611.00 0xcb000003    ★-10.75 -> -11.00
  -8388611.00-0.25 = -8388612.00 0xcb000004    ★-11.25 -> -12.00
  -8388611.00-0.50 = -8388612.00 0xcb000004    ★-11.50 -> -12.00
  -8388611.00-0.75 = -8388612.00 0xcb000004    ★-11.75 -> -12.00
TONEAREST    ★最近接数に丸める、真ん中(0.5)は偶数側に丸める
   8388610.00+0.25 =  8388610.00 0x4b000002    ★10.25 ->  10.00
   8388610.00+0.50 =  8388610.00 0x4b000002    ★10.50 ->  10.00
   8388610.00+0.75 =  8388611.00 0x4b000003    ★10.75 ->  11.00
   8388611.00+0.25 =  8388611.00 0x4b000003    ★11.25 ->  11.00
   8388611.00+0.50 =  8388612.00 0x4b000004    ★11.50 ->  12.00
   8388611.00+0.75 =  8388612.00 0x4b000004    ★11.75 ->  12.00
  -8388610.00-0.25 = -8388610.00 0xcb000002    ★-10.25 -> -10.00
  -8388610.00-0.50 = -8388610.00 0xcb000002    ★-10.50 -> -10.00
  -8388610.00-0.75 = -8388611.00 0xcb000003    ★-10.75 -> -11.00
  -8388611.00-0.25 = -8388611.00 0xcb000003    ★-11.25 -> -11.00
  -8388611.00-0.50 = -8388612.00 0xcb000004    ★-11.50 -> -12.00
  -8388611.00-0.75 = -8388612.00 0xcb000004    ★-11.75 -> -12.00
TOWARDZERO    ★ゼロ方向に丸める
   8388610.00+0.25 =  8388610.00 0x4b000002    ★10.25 ->  10.00
   8388610.00+0.50 =  8388610.00 0x4b000002    ★10.50 ->  10.00
   8388610.00+0.75 =  8388610.00 0x4b000002    ★10.75 ->  10.00
   8388611.00+0.25 =  8388611.00 0x4b000003    ★11.25 ->  11.00
   8388611.00+0.50 =  8388611.00 0x4b000003    ★11.50 ->  11.00
   8388611.00+0.75 =  8388611.00 0x4b000003    ★11.75 ->  11.00
  -8388610.00-0.25 = -8388610.00 0xcb000002    ★-10.25 -> -10.00
  -8388610.00-0.50 = -8388610.00 0xcb000002    ★-10.50 -> -10.00
  -8388610.00-0.75 = -8388610.00 0xcb000002    ★-10.75 -> -10.00
  -8388611.00-0.25 = -8388611.00 0xcb000003    ★-11.25 -> -11.00
  -8388611.00-0.50 = -8388611.00 0xcb000003    ★-11.50 -> -11.00
  -8388611.00-0.75 = -8388611.00 0xcb000003    ★-11.75 -> -11.00
UPWARD    ★プラス無限大方向に丸める
   8388610.00+0.25 =  8388611.00 0x4b000003    ★10.25 ->  11.00
   8388610.00+0.50 =  8388611.00 0x4b000003    ★10.50 ->  11.00
   8388610.00+0.75 =  8388611.00 0x4b000003    ★10.75 ->  11.00
   8388611.00+0.25 =  8388612.00 0x4b000004    ★11.25 ->  12.00
   8388611.00+0.50 =  8388612.00 0x4b000004    ★11.50 ->  12.00
   8388611.00+0.75 =  8388612.00 0x4b000004    ★11.75 ->  12.00
  -8388610.00-0.25 = -8388610.00 0xcb000002    ★-10.25 -> -10.00
  -8388610.00-0.50 = -8388610.00 0xcb000002    ★-10.50 -> -10.00
  -8388610.00-0.75 = -8388610.00 0xcb000002    ★-10.75 -> -10.00
  -8388611.00-0.25 = -8388611.00 0xcb000003    ★-11.25 -> -11.00
  -8388611.00-0.50 = -8388611.00 0xcb000003    ★-11.50 -> -11.00
  -8388611.00-0.75 = -8388611.00 0xcb000003    ★-11.75 -> -11.00
丸めモードの切り替えが正常に働いている様子がわかります。またTONEARESTの丸めモードにした場合、ties to evenであることも観察できます。
C言語の規格は何と言っている?
C99のfinal draftをざっと見た限りでは、ties to evenかties away from zeroか、明確に書かれていないように見えました。規格的にはどちらなんでしょうね?実装依存なのかなあ?
コメント一覧
- コメントはありません。
 この記事にコメントする
2021年3月7日
電源タップの雷ガード
目次: PC
在宅勤務環境を整えようと、電源タップを物色していました。電源タップを見ていると大体3つに分類できて、
- 普通のタップ
- スイッチ付き
- 雷ガード(雷サージ保護)付き
前者2つはわかりやすいです。3つ目の雷ガードとは何者でしょう?前から不思議だったので、軽く調べました。
雷ガードの定義
雷ガードは雷の直撃を防ぐわけではなく(それは避雷針の仕事)、落雷したとき電線に混入する1〜20kV程度のサージ電流を防ぐ仕組みのようです。パナソニックのタップは0.8kV, 1.2kV、LED照明器具は15kV、サンワサプライは15kV, 20kVを最大電圧とした製品を見つけました。
- 「雷サージ保護」の定義 - サンワサプライ
- 雷ガード(雷サージ吸収素子X3)TAP-SP302BK - サンワサプライ
- パナソニック耐雷サージ性能 | 安心品質実験レポート | パナソニック
- 「雷サージ」を防ぐタップを販売しているか、教えてください。 - タップ・延長コード - パナソニック
保護の仕組みですが、サンワサプライは電源系にはバリスタ(Varistor, Variable Resistor)を使っていると書いています。パナソニックのサイトも雷サージ対策にバリスタとあるので、バリスタがポピュラーな仕組みなのでしょう。
参考: 【EMC対策】雷サージ対策部品 "バリスタ" の落とし穴 - パナソニック
バリスタはいわゆる静電気(ESD, Electric Static Discharge)対策で使われる素子です。ツェナーダイオードを2つ逆接続したようなV-I特性で、電圧の正負を気にせず、とにかく高い電圧に対し低い抵抗値を持ちます。
参考: チップバリスタ - 電子デバイス・産業用機器 - パナソニック
バリスタと本体の電子機器を並列に接続します。回路に高い電圧が掛かると、バリスタ側の抵抗値が急激に下がり、バリスタ側に電流が流れます。バリスタ側に電流が逃げることで、本体の電子機器は高い電圧を食らわずに済みサージ電流から保護される仕組みです。
ESDの場合は素子が壊れないように十分な耐圧のバリスタを選定すると思いますが、雷サージの電圧は最大何Vかわかりません。時にバリスタが耐えられない電圧が掛かり、バリスタが故障します。特にバリスタがショートモードで故障し、ユーザーが気づかずに使い続けた場合、素子が加熱し火災が発生する恐れがあります。
これは実際に起きた事故で、10年前にNOATEKの雷ガード製品がバリスタの加熱&火災を起こし150万個もリコールされました。NITEの解説を見る限り、この製品は「雷ガード=バリスタ入れればOK」という甘い設計だったため、ショートモードで故障した後、加熱を検知できず火災に至ったようです。
雷を防いだら、火事になりました、なんて製品は全く笑えません。安全な設計というのは難しいですね。
こんなことばかり調べているから、全然買い物が進みません。在宅勤務環境が整うのはまだ先のようです……。
メモ: 技術系の話はFacebookから転記しておくことにした。リンク、情報追加、加筆。
コメント一覧
- コメントはありません。
 この記事にコメントする
2021年3月6日
気に入るマウスはどれ?
目次: PC
手に合うワイヤレスマウスを探し続け、高級製品、小さい製品、お手ごろ製品と買いまくり、一時は家に5個くらいワイヤレスマウスがありました。
日記から遍歴を辿ってみたところ、少なくとも下記の製品を持っていたようです。
- 2004年12月: Logitech Optical Mouse USB M-UV96
- 2007年1月: Logicool Nano Cordless Laser Mouse V450
- 2010年2月: Logicool Cordless Laser Mouse MX1100
- 2011年12月: Logicool Wireless Mouse M510
- 2012年4月: Logicool Perfomance MX M950
- 2013年10月: Microsoft Wireless Mouse 1000
- 2014年8月: Logicool Perfomance MX M950(2個目)
- 2017年5月: エレコムEX-G Ultimate Laser Mouse M-XGL20DLBK
- 2017年5月: Logicool Wireless Mouse M560
- 2017年12月: Logicool Marathon Mouse M705
- 2021年1月: Microsoft Basic Optical Mouse
- 2024年9月: Microsoft Basic Optical Mouse(2個目)
全部で11個です。こんなに買っていたとは思いませんでした……。
最終的に辿り着いた先は
色々試して最終的に辿り着いたのは、Microsoftの1000円の有線マウス(Basic Optical Mouse)でした。このマウスは中身がほぼ空っぽでめちゃくちゃ軽いです。
はい、何ですか?ワイヤレスじゃないって?そうですね。ワイヤレスマウスはどうしても重くて、手首が疲れてしまいダメでした。
小さいワイヤレスマウスなら軽いですが、手の大きさと合わずやっぱり手が疲れてしまいます。どうもマウスの持ち方(親指と小指で挟むように持つ)が、小さいマウス、ワイヤレスマウスと合わないみたいです。
という訳でワイヤレスマウスは諦めました。有線マウスは安くて軽くて最高です!
メモ: 技術系の話はFacebookから転記しておくことにした。マウス遍歴を追加。
コメント一覧
- コメントはありません。
 この記事にコメントする
2021年3月4日
VSCodeを使ってWindowsからLinuxアプリのデバッグ その2
目次: Linux
昨日(2021年3月3日の日記参照)の続きです。
GDBの準備
Windows側で使用するGDBを用意します。最初はMinGWのバイナリが使えるかと思ったのですが、MinGWのバイナリはWindowsの実行形式(COFF)のデバッグ用で、Linuxの実行形式(ELF)は認識せず、ダメでした。残念。
GDBはbinutilsに含まれています。ビルド方法を下記に示します。バージョンは何でも良いと思いますが、私はMinGWも使っている2.32にしました。
binutils, gdbのビルド
$ git clone git://sourceware.org/git/binutils-gdb.git
$ cd binutils-gdb
$ git checkout -b 2_32 binutils-2_32

$ mkdir build
$ cd build
$ ../configure \
    --host=x86_64-w64-mingw32 \
    --target=x86_64-unknown-linux-gnu \
    --prefix=`pwd`/_install \
    --disable-werror \
    --with-expat=no \
    --enable-sim \
    --enable-libdecnumber \
    --enable-libreadline \
    --enable-gas \
    --enable-binutils \
    --enable-ld \
    --disable-gold \
    --enable-gprof

$ make -j8
$ make install
ビルドが成功すると、build/_installディレクトリにWindows用のbinutilsのバイナリ(GDBも含む)がインストールされます。フォルダごとWindows側にコピーすれば動きます。ディレクトリの名前 _installはWindows側に持っていったあとに変更しても構いません。
比較的、新しい環境(Ubuntu 20など)だとMinGWが何か変らしく、gdb/common/common-defs.hにある _FORTIFY_SOURCEの定義を消さないと、リンクの時に __memcpy_chk() などの関数が見当たらないと言われてエラーになります。
比較的新しいMinGWでbinutilsをビルドすると遭遇するエラー
  CXXLD  gdb.exe
/usr/bin/x86_64-w64-mingw32-ld: ada-tasks.o:/usr/share/mingw-w64/include/string.h:202: undefined reference to `__memcpy_chk'
/usr/bin/x86_64-w64-mingw32-ld: amd64-tdep.o:/usr/share/mingw-w64/include/string.h:202: undefined reference to `__memcpy_chk'
/usr/bin/x86_64-w64-mingw32-ld: breakpoint.o:/usr/share/mingw-w64/include/string.h:228: undefined reference to `__strcpy_chk'
/usr/bin/x86_64-w64-mingw32-ld: breakpoint.o:/usr/share/mingw-w64/include/string.h:228: undefined reference to `__strcpy_chk'
...
とりあえず下記のパッチでエラーは回避できますが、おそらく正しい直し方ではありません。原因は調べていません。もしご存知の方は教えていただけると嬉しいです。
FORTIFY_SOURCEを無効化するパッチ
diff --git a/gdb/common/common-defs.h b/gdb/common/common-defs.h
index e574de5ed66..a9b0520b4c5 100644
--- a/gdb/common/common-defs.h
+++ b/gdb/common/common-defs.h
@@ -69,7 +69,7 @@
    then we don't do anything.  */

 #if !defined _FORTIFY_SOURCE && defined __OPTIMIZE__ && __OPTIMIZE__ > 0
-#define _FORTIFY_SOURCE 2
+//#define _FORTIFY_SOURCE 2
 #endif

 #include <stdarg.h>
面倒であれば、ビルド済みのバイナリ( binutils_x86_64-unknown-linux-gnu.zip)をどこか適当なディレクトリに展開してもらえれば動くはずです。Windows 10で動作確認しています。
Windows側の準備
Visual Studio Codeをインストールします。Microsoftのサイトからダウンロードできます(Visual Studio Code - Code Editing. Redefined)。
はじめにC/C++ Extensionをインストールします。GDBと連携するためです。

VSCode C/C++ Extensionのインストール画面
先ほどのテストプログラムが置いてあるディレクトリを開きます。メニューの [File] - [Open Folder] です。ここではZ:\projects\c\test_argvにあるとします。
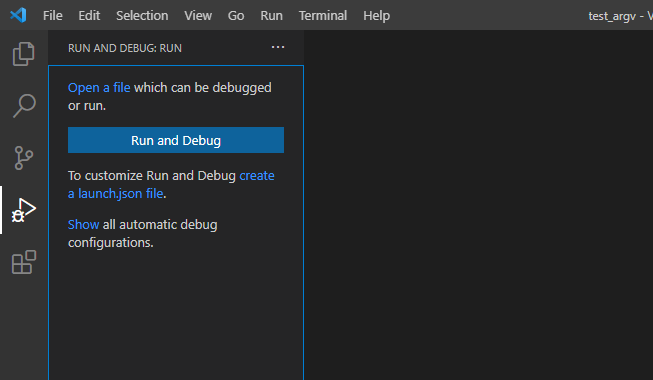
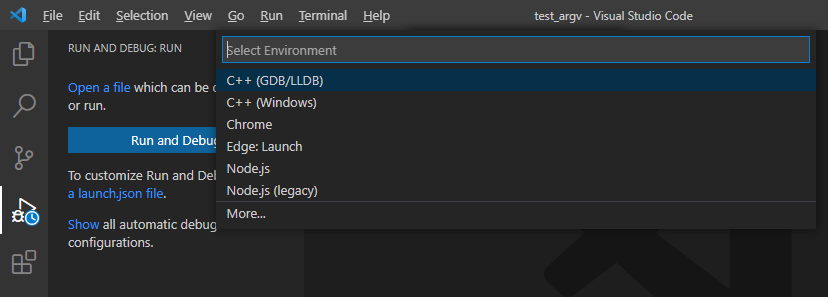
左側のタブからRun and Debugを選択します。Ctrl + Shift + Dでも良いです。次に青いRun and Debugボタンを押します。するとSelect Environmentというコンボボックスが出てくるのでC++ (GDB/LLDB) を選択します。
ソースコードペインにlaunch.jsonのテンプレートが表示されると思うので、下記の内容に書き換えます。miDebuggerPathやmiDebuggerServerAddressは適宜、環境に合わせて書き換えてください。
launch.jsonの記述例
{
    "version": "0.2.0",
    "configurations": [
        {
            "name": "(gdb) Attach",
            "type": "cppdbg",
            "request": "launch",
            "program": "${workspaceFolder}/a.out",
            "cwd": "${workspaceFolder}",
            "MIMode": "gdb",
            "miDebuggerPath": "c:\\app\\binutils\\bin\\x86_64-unknown-linux-gnu-gdb.exe",
            "miDebuggerServerAddress": "192.168.1.2:1234",
            "setupCommands": [
                {
                    "description": "Enable pretty-printing for gdb",
                    "text": "-enable-pretty-printing",
                    "ignoreFailures": true,
                },
                {
                    "description": "Relace absolute path of source code",
                    "ignoreFailures": false,
                    "text": "set substitute-path /home/katsuhiro/share/falcon z:/",
                },
            ],
        },
    ]
}
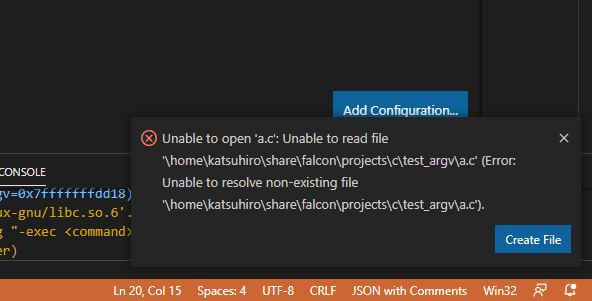
ここで大事なのはsetupCommandsのset substitute-pathです。gdbはLinux側の絶対パスでソースコードの場所を通知してくることがあります。Linux側の絶対パスを渡されてもWindows側ではファイルを探せませんから、絶対パスの一部をWindows側に存在するパスに置き換えることで、VSCodeがソースコードを見つけられるように設定してあげないと、こんなエラーで怒られます。
今回の例では、
- Linuxから見たテストプログラムのある場所: /home/katsuhiro/share/falcon/projects/c/test_argv
- LinuxからSambaでWindowsに見せている場所: /home/katsuhiro/share/falcon
- Windowsのリモートドライブレター: Z:
- Windowsから見たテストプログラムのある場所: Z:/projects/c/test_argv
このような設定にしていますから、Windows側のネットワークドライブZ:/ が、Linux側の /home/katsuhiro/share/falconを指していることを伝えるために、上記の例のように "set substitute-path /home/katsuhiro/share/falcon z:/" にします。もし対応がわからない場合はSambaの設定を確認しましょう。
いざデバッグ
いよいよ最終目的であるLinux側のgdbserverと、Windows側のVSCode + GDBを連携させます。図示するとこのような構成です。
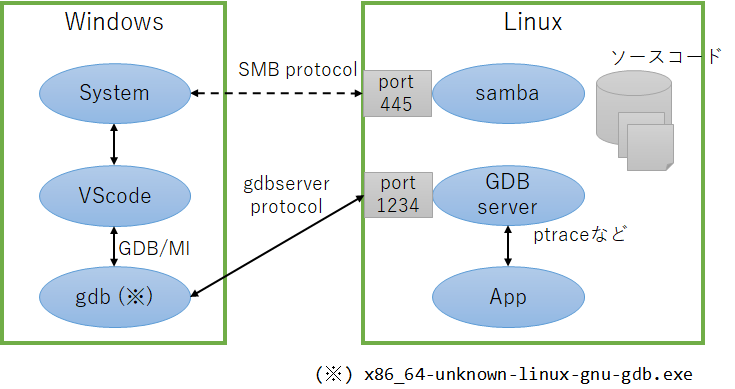
WindowsからLinuxアプリのデバッグ、それぞれの役割(再掲)
実際にやってみましょう。最初にLinux側でgdbserverを起動します。
Linux側の操作
$ gdbserver --multi localhost:1234 ./a.out a b c d

Process ./a.out created; pid = 15409
Listening on port 1234
Remote debugging from host ::ffff:192.168.1.112, port 64957

★mainでbreakしたあとcontinueすると下記が出力される

argc: 5
argv[1]: aa
argv[2]: bb
argv[3]: cc
argv[4]: dd

Child exited with status 0
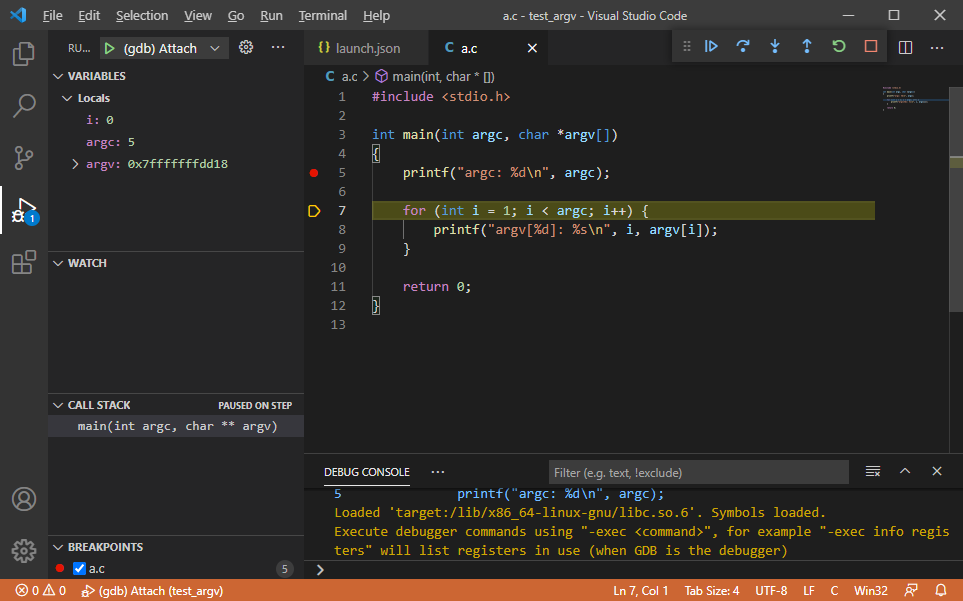
その後、VSCodeでmainにブレークポイントを設定します。F5キーを押してデバッグ開始すると、main() 関数で停止し、ソースコードが表示されるはずです。
うまくいきました、良かった良かった。
繋がらないときは
Unable to start debugging. Unexpected GDB output from command... のように言われて、デバッグできない場合は、
- miDebuggerPathの場所にx86_64-unknown-linux-gnu-gdb.exeはあるか?
- miDebuggerPathに指定したファイルはコマンドプロンプトなどから実行可能か?
- miDebuggerServerAddressは正しいか?
- gdbserverを起動し忘れていないか?
- Windows用のGDBからtarget remote [miDebuggerServerAddressに指定したアドレス] としたとき繋がるか?
上記を今一度チェックしてみてください。特にgdbserverはデバッグの度に毎回起動しなければなりません。割と忘れがちです。これ非常に面倒なので、改善方法が既にありそうな気がします(今はわかりません)。
Windows要らなくない?
そこに気づかれましたか、鋭いですね、おっしゃる通りです。私もbinutilsをビルドし終わった辺りで、もしやVSCodeをLinux側で動かせば何の苦労もなかったのでは?と気づきましたが、遅すぎたのでここまで突っ走りました。正直、Windowsを使うだけ面倒で、何も利点がないです。なるほど、この方法を実践している人が誰もいないわけです。
Windowsからデバッグだけする方法が向いている人、環境ですか……?うーん、ほとんど居ないと思いますが、強いていえばLinux PCのGUI環境を整備しておらず、整備も面倒と思っていて、普段遣いのWindows PCしか持っていないような方でしょうか。この手順も大概面倒くさいけどね。
コメント一覧
- 名無しさん(2022/01/13 17:10)
setupCommandsに"text": "shell ssh remoteHost gdbserver :1234 a.out ${args[@]}"}\nlocalなら、\n{"text": "shell gdbserver :1234 a.out ${args[@]}"}\n - すずきさん(2022/01/14 09:16)
なるほど。setupCommandsでgdbserverを起動できるんですね。コメントありがとうございます。
 この記事にコメントする
2021年3月3日
VSCodeを使ってWindowsからLinuxアプリのデバッグ その1
目次: Linux
同じことをしている人があまり居なさそうだったので、メモしておきます。
きっかけはGCCのコードをGDBのCUIモードで追っていて辛くなったことです。GCCのコードは超ぐちゃぐちゃの悲惨なコードで非常に追いづらく、GDBをもってしても何が起きているのか把握するのは困難です。せめてデバッガの画面くらいはGUIにして、見やすくできないか、と考えました。

WindowsからLinuxアプリのデバッグ、それぞれの役割
想定する構成は上記のとおりで、Linux側にはGUIがなく(ディスプレイを繋いでいない、など)、Windows側はデバッグのみで、Linux側でその他の全て(ビルドなど)を行う想定です。
Linux側の準備
この記事を読んでいるということは、既に何かデバッグしたいアプリケーションがあると思いますから、基本的なツールであるgccやmakeなどのインストールは省略させてもらいます。gdbserverをインストールするだけで良いはずです。
gdbserverのインストール
# apt-get install gdbserver

Reading package lists... Done
Building dependency tree
Reading state information... Done
The following NEW packages will be installed:
  gdbserver
0 upgraded, 1 newly installed, 0 to remove and 0 not upgraded.
Need to get 0 B/458 kB of archives.
After this operation, 1165 kB of additional disk space will be used.
Selecting previously unselected package gdbserver.
(Reading database ... 99167 files and directories currently installed.)
Preparing to unpack .../gdbserver_8.2.1-2+b3_amd64.deb ...
Unpacking gdbserver (8.2.1-2+b3) ...
Setting up gdbserver (8.2.1-2+b3) ...
デバッグするプログラムは何でも良いですが、下記を使用します。渡した引数を表示するだけのプログラムです。
デバッグ対象のプログラム、ソースコード
#include <stdio.h>

int main(int argc, char *argv[])
{
	printf("argc: %d\n", argc);

	for (int i = 0; i < argc; i++) {
		printf("argv[%d]: %s\n", i, argv[i]);
	}

	return 0;
}
デバッグ対象のプログラム、実行結果
$ gcc -Wall -g -O0 a.c

$ ./a.out a b c

argc: 4
argv[1]: a
argv[2]: b
argv[3]: c
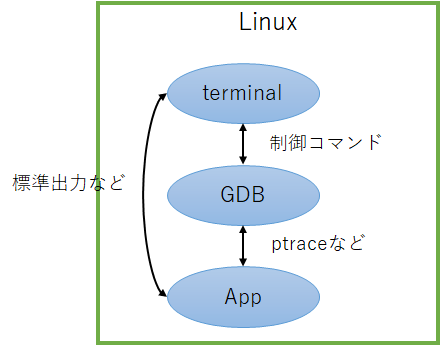
まずは普通にCUIからGDBで追ってみます。図示するとこのような構成です。
あえてやる必要もなさそうですけど、このあとの一貫性のために試します。
GDB CUIデバッグ
$ gdb a.out

...
For help, type "help".
Type "apropos word" to search for commands related to "word"...
Reading symbols from a.out...

(gdb) b main

Breakpoint 1 at 0x1144: file a.c, line 5.

(gdb) r a b c d

Starting program: /home/katsuhiro/share/falcon/projects/c/test_argv/a.out a b c d

Breakpoint 1, main (argc=5, argv=0x7fffffffdca8) at a.c:5
5               printf("argc: %d\n", argc);

(gdb) c

Continuing.
argc: 5
argv[1]: a
argv[2]: b
argv[3]: c
argv[4]: d
[Inferior 1 (process 4008866) exited normally]
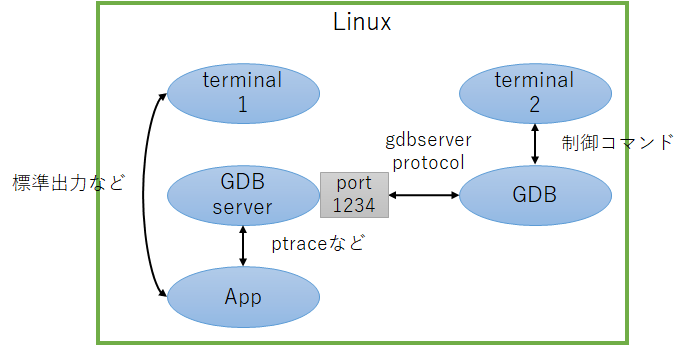
普通です。次はgdbserverと連携させリモートでGDBで追ってみます。図示するとこのような構成です。
実際にやってみましょう。ターミナルを2つ用意してください。
GDB CUIリモートデバッグ
★★ターミナル1つ目

$ gdbserver --multi localhost:1234 ./a.out a b c d

Process ./a.out created; pid = 4008908
Listening on port 1234
Remote debugging from host ::1, port 32918

★mainでbreakしたあとのcontinueを実行すると下記が出力される

argc: 5
argv[1]: a
argv[2]: b
argv[3]: c
argv[4]: d

Child exited with status 0


★★ターミナル2つ目

$ gdb

...
For help, type "help".
Type "apropos word" to search for commands related to "word".

(gdb) target remote :1234

Remote debugging using :1234
Reading test_argv/a.out from remote target...
warning: File transfers from remote targets can be slow. Use "set sysroot" to access files locally instead.
Reading test_argv/a.out from remote target...
Reading symbols from target:test_argv/a.out...
Reading /lib64/ld-linux-x86-64.so.2 from remote target...
Reading /lib64/ld-linux-x86-64.so.2 from remote target...
Reading symbols from target:/lib64/ld-linux-x86-64.so.2...
Reading symbols from /usr/lib/debug/.build-id/5b/e47e85c990f390b0dccb6ca9dc3e70f410dc6a.debug...
0x00007ffff7fd3090 in _start () from target:/lib64/ld-linux-x86-64.so.2

(gdb) b main

Breakpoint 1 at 0x555555555144: file a.c, line 5.

(gdb) c

Continuing.
Reading /lib/x86_64-linux-gnu/libc.so.6 from remote target...

Breakpoint 1, main (argc=5, argv=0x7fffffffdd18) at a.c:5
5               printf("argc: %d\n", argc);

(gdb) l

1       #include <stdio.h>
2
3       int main(int argc, char *argv[])
4       {
5               printf("argc: %d\n", argc);
6
7               for (int i = 1; i < argc; i++) {
8                       printf("argv[%d]: %s\n", i, argv[i]);
9               }
10

(gdb) c

Continuing.
[Inferior 1 (process 4008908) exited normally]
ブレークもできますし、ソースコードも表示されます。良い感じですね。
使い勝手はGDB単体でデバッグするときとほぼ同じですが、1点だけ注意があります。デバッガとして動作するのはgdbserverであり、プログラムのprintfなどの標準出力は、gdbserverを動かしているターミナル側に出ることに注意してください。この使い方におけるGDBはgdbserverと通信するだけの役です。
Sambaのセットアップについては、ここで解説せずとも、詳しいサイトがたくさんあると思いますので、そちらをご参照ください。
思ったより長くなってきたので、続きは次回に。
コメント一覧
- Shigeさん(2021/06/17 13:28)
とても参考になりました。
Good!!! - すずきさん(2021/06/17 17:24)
お役に立てたようで幸いです。
 この記事にコメントする
| < | 2021 | > | ||||
| << | < | 03 | > | >> | ||
| 日 | 月 | 火 | 水 | 木 | 金 | 土 |
| - | 1 | 2 | 3 | 4 | 5 | 6 |
| 7 | 8 | 9 | 10 | 11 | 12 | 13 |
| 14 | 15 | 16 | 17 | 18 | 19 | 20 |
| 21 | 22 | 23 | 24 | 25 | 26 | 27 |
| 28 | 29 | 30 | 31 | - | - | - |
最近のコメント20件
-
 24年12月9日
Up2Uさん (01/15 12:57)
「Hi I also find the p...」 -
 25年12月18日
すずきさん (12/23 23:51)
「良く見たらksys_read()でfil...」 -
 25年12月18日
すずきさん (12/23 23:15)
「ですね、まあpread+readだと話が...」 -
 25年12月18日
hdkさん (12/21 08:34)
「昔試しにデバイスドライバーを作ったことが...」 -
 25年11月28日
hdkさん (12/04 08:10)
「あれ、停止直前くらいの時のトルクコンバー...」 -
 25年11月28日
すずきさん (12/03 11:24)
「トルクコンバーターがいてエンブレは掛かり...」 -
 25年11月28日
hdkさん (12/02 08:02)
「"停止直前に急にエンブレがほぼゼロになる...」 -
 25年10月6日
すずきさん (10/10 13:14)
「ですね。ccはもはやコンパイラというより...」 -
 25年10月6日
hdkさん (10/10 08:27)
「ただのHello, worldでも試して...」 -
 25年9月29日
すずきさん (10/03 00:29)
「なんと、メタパッケージ入れてなかったです...」 -
 25年9月29日
hdkさん (10/02 06:51)
「あれ、dkmsは自動ビルドされるのが便利...」 -
 20年8月24日
すずきさん (08/30 22:06)
「ですね、自分も今はPulseAudioを...」 -
 20年8月24日
hdkさん (08/29 09:32)
「ALSA懐かしい... PulseAud...」 -
 16年2月14日
すずきさん (08/04 01:31)
「お役に立ったようでしたら幸いです。」 -
 16年2月14日
enc28j60さん (08/03 17:40)
「ちょうど詰まっていたところです。\n非常...」 -
 25年7月20日
すずきさん (07/30 00:10)
「ギクシャクするのは減速時の2速シフトダウ...」 -
 25年7月20日
hdkさん (07/29 07:38)
「2速発進でギクシャクするんですか? 面白...」 -
 25年7月20日
すずきさん (07/28 23:16)
「なるほど。レガシィB4のATはDレンジで...」 -
 25年7月20日
hdkさん (07/28 21:28)
「MT車でも1速はギクシャクするので完全に...」 -
 25年7月20日
すずきさん (07/28 00:44)
「何日か乗ってみて気づいたんですが、Dレン...」
最近の記事3件
こんてんつ
 wiki
wiki Linux JM
 Java API
過去の日記
 2002年
2002年 2003年
2003年 2004年
2004年 2005年
2005年 2006年
2006年 2007年
2007年 2008年
2008年 2009年
2009年 2010年
2010年 2011年
2011年 2012年
2012年 2013年
2013年 2014年
2014年 2015年
2015年 2016年
2016年 2017年
2017年 2018年
2018年 2019年
2019年 2020年
2020年 2021年
2021年 2022年
2022年 2023年
2023年 2024年
2024年 2025年
2025年 2026年
2026年 過去日記について
その他の情報
 アクセス統計
 サーバ一覧
サーバ一覧 サイトの情報
合計:
本日:
