2024年9月24日
OpenSBIを調べる - CPUの列挙
目次: Linux
以前、OpenSBIがRISC-V CPUの拡張機能をどのように認識し有効にするか調べました。今回はどのようにCPUの数を認識するか調べます。OpenSBIのプラットフォームは今まで同様にgenericを使います。
実はそんなに難しくなく、デバイスツリーの/cpuノードを読みに行くだけのようです。/cpuノードの例としてQEMU virtマシン、4CPUで起動したときにQEMUが生成するデバイスツリーを下記に示します。長いのでCPU_2, 3は省略しています。名前やラベル、regが2や3になるだけです。
デバイスツリーのCPUノードの例
/ {
	cpus {
		#address-cells = <1>;
		#size-cells = <0>;
		timebase-frequency = <10000000>;

		cpu0: cpu@0 {
			compatible = "riscv";
			reg = <0>;
			device_type = "cpu";
			riscv,cbop-block-size = <64>;
			riscv,cboz-block-size = <64>;
			riscv,cbom-block-size = <64>;
			riscv,isa-extensions = "i", "m", "a", "f", "d", "c", "h",
				"zic64b", "zicbom", "zicbop", "zicboz",
				"ziccamoa", "ziccif", "zicclsm", "ziccrse",
				"zicntr", "zicsr", "zifencei", "zihintntl",
				"zihintpause", "zihpm", "za64rs", "zawrs",
				"zfa", "zca", "zcd", "zba", "zbb", "zbc", "zbs",
				"ssccptr", "sscounterenw", "sstc", "sstvala",
				"sstvecd", "svadu";
			riscv,isa-base = "rv64i";
			riscv,isa = "rv64imafdch_zic64b_zicbom_zicbop_zicboz_ziccamoa_ziccif_zicclsm_ziccrse_zicntr_zicsr_zifencei_zihintntl_zihintpause_zihpm_za64rs_zawrs_zfa_zca_zcd_zba_zbb_zbc_zbs_ssccptr_sscounterenw_sstc_sstvala_sstvecd_svadu";
			mmu-type = "riscv,sv57";

			status = "okay";

			cpu0_intc: interrupt-controller {
				compatible = "riscv,cpu-intc";
				interrupt-controller;
				#interrupt-cells = <1>;
			};
		};

		cpu1: cpu@1 {
			compatible = "riscv";
			reg = <1>;
			device_type = "cpu";
			riscv,cbop-block-size = <64>;
			riscv,cboz-block-size = <64>;
			riscv,cbom-block-size = <64>;
			riscv,isa-extensions = "i", "m", "a", "f", "d", "c", "h",
				"zic64b", "zicbom", "zicbop", "zicboz",
				"ziccamoa", "ziccif", "zicclsm", "ziccrse",
				"zicntr", "zicsr", "zifencei", "zihintntl",
				"zihintpause", "zihpm", "za64rs", "zawrs",
				"zfa", "zca", "zcd", "zba", "zbb", "zbc", "zbs",
				"ssccptr", "sscounterenw", "sstc", "sstvala",
				"sstvecd", "svadu";
			riscv,isa-base = "rv64i";
			riscv,isa = "rv64imafdch_zic64b_zicbom_zicbop_zicboz_ziccamoa_ziccif_zicclsm_ziccrse_zicntr_zicsr_zifencei_zihintntl_zihintpause_zihpm_za64rs_zawrs_zfa_zca_zcd_zba_zbb_zbc_zbs_ssccptr_sscounterenw_sstc_sstvala_sstvecd_svadu";
			mmu-type = "riscv,sv57";

			status = "okay";

			cpu1_intc: interrupt-controller {
				compatible = "riscv,cpu-intc";
				interrupt-controller;
				#interrupt-cells = <1>;
			};
		};

		cpu2: cpu@2 {
			/* 省略 */
		};

		cpu3: cpu@3 {
			/* 省略 */
		};
OpenSBIがCPU数を確認するコードは下記のようになっています。
OpenSBIがCPU数を確認するコード
// opensbi/platform/generic/platform.c

unsigned long fw_platform_init(unsigned long arg0, unsigned long arg1,
				unsigned long arg2, unsigned long arg3,
				unsigned long arg4)
{
	const char *model;
	void *fdt = (void *)arg1;    //★★デバイスツリーのアドレス、レジスタa1を使ってOpenSBIに渡す★★
	u32 hartid, hart_count = 0;
	int rc, root_offset, cpus_offset, cpu_offset, len;

	//...

	cpus_offset = fdt_path_offset(fdt, "/cpus");
	if (cpus_offset < 0)
		goto fail;

	fdt_for_each_subnode(cpu_offset, fdt, cpus_offset) {
		//★★device_typeがcpu、regプロパティに値が入っていれば、CPUのノードとみなす★★
		rc = fdt_parse_hart_id(fdt, cpu_offset, &hartid);
		if (rc)
			continue;

		if (SBI_HARTMASK_MAX_BITS <= hartid)
			continue;

		//★★statusプロパティがokかokayなら有効なCPUとみなす★★
		if (!fdt_node_is_enabled(fdt, cpu_offset))
			continue;

		//★★ハート数を1つ増やす★★
		//★★hartidは連番とは限らないため、hartindexとhartidの対応表を作る★★
		generic_hart_index2id[hart_count++] = hartid;
	}

	//★★platform領域に記録する★★
	platform.hart_count = hart_count;
	platform.heap_size = fw_platform_calculate_heap_size(hart_count);
	platform_has_mlevel_imsic = fdt_check_imsic_mlevel(fdt);
デバイスツリー(正確にはFDT: flattened device tree)の/cpuノードを見て、子ノードがCPUの定義であり、有効ならばhart_countを+1するシンプルなコードです。hartidは連番とは限らないため、hartindex(0からCPU数 - 1までの連番)とhartidの対応表generic_hart_index2id[]も同時に作ります。
無効なCPUはどうなるか?
無効なCPUの扱いも見ておきます。先程のコードからわかる通りstatus = "disabled"つまり無効なCPUの場合は、hartindexとhartidの対応表(platform.hart_index2id[])にhartidが載りません。例としてQEMUにてCPU 4つで起動し、デバイスツリーでCPU 2だけstatus = "disabled"にしたときのhartindexとhartidの対応表をダンプします。
4CPU, CPU2だけ無効のときのhartindexとhartidの対応表
(gdb) p platform
$11 = {opensbi_version = 65541, platform_version = 1,
  name = "riscv-virtio,qemo", '\000' <repeats 46 times>, features = 2,
  hart_count = 3, hart_stack_size = 8192, heap_size = 39936, reserved = 0,
  platform_ops_addr = 2148010200, firmware_context = 0,
  hart_index2id = 0x80083700 <generic_hart_index2id>}

(gdb) p generic_hart_index2id
$15 = {0, 1, 3, 0 <repeats 125 times>}
全CPUが有効ならば0, 1, 2, 3となりますが、CPU 2が無効なので0, 1, 3となっていることがわかります。
次にメインCPUがサブCPUを起こしに行くコードを見ます。アセンブラなので若干分かりづらいですが、hartindexとhartidの対応表に自CPUのhartidが登録されていればCPUを起動し、登録されていない場合はCPUを起動しません。
OpenSBIがサブCPUを起こす処理
// opensbi/firmware/fw_base.S

_fdt_reloc_done:
	//★★メインCPUはこちら★★
	//★★初期化処理が終わるとここに到達する★★
	//★★_boot_statusにBOOT_STATUS_BOOT_HART_DONEを書き込むとサブCPU側がループを抜ける★★
	/* mark boot hart done */
	li	t0, BOOT_STATUS_BOOT_HART_DONE
	lla	t1, _boot_status
	fence	rw, rw
	REG_S	t0, 0(t1)
	j	_start_warm

	//★★サブCPUはこちら★★
	//★★_boot_statusを読みながらループで待っている★★
	/* waiting for boot hart to be done (_boot_status == 2) */
_wait_for_boot_hart:
	li	t0, BOOT_STATUS_BOOT_HART_DONE
	lla	t1, _boot_status
	REG_L	t1, 0(t1)
	/* Reduce the bus traffic so that boot hart may proceed faster */
	div	t2, t2, zero
	div	t2, t2, zero
	div	t2, t2, zero
	bne	t0, t1, _wait_for_boot_hart

_start_warm:
	/* Reset all registers except ra, a0, a1, a2, a3 and a4 for non-boot HART */
	li	ra, 0
	call	_reset_regs

	/* Disable all interrupts */
	csrw	CSR_MIE, zero

	//★★platform.hart_index2idを見て、hartidと一致する要素があるか確かめる★★
	/* Find HART count and HART stack size */
	lla	a4, platform
#if __riscv_xlen > 32
	lwu	s7, SBI_PLATFORM_HART_COUNT_OFFSET(a4)
	lwu	s8, SBI_PLATFORM_HART_STACK_SIZE_OFFSET(a4)
#else
	lw	s7, SBI_PLATFORM_HART_COUNT_OFFSET(a4)
	lw	s8, SBI_PLATFORM_HART_STACK_SIZE_OFFSET(a4)
#endif
	//★★s9はplatform.hart_index2id[0]のアドレス★★
	REG_L	s9, SBI_PLATFORM_HART_INDEX2ID_OFFSET(a4)

	/* Find HART id */
	csrr	s6, CSR_MHARTID

	//★★platform.hart_index2idがNULLだったら処理を止める★★
	/* Find HART index */
	beqz	s9, 3f
	li	a4, 0

	//★★a4 = hartindex
	//★★a5 = platform.hart_index2id[hartindex]の値(hartindexに対応するhartid)
	//★★s6 = CPUのhartid
	//★★s7 = hart数
	//★★s9 = platform.hart_index2id[hartindex]のアドレス
1:
#if __riscv_xlen > 32
	lwu	a5, (s9)
#else
	lw	a5, (s9)
#endif
	//★★hartidとplatform.hart_index2id[n]が一致していたら、ループを抜ける★★
	beq	a5, s6, 2f

	//★★s9を進めて、platform.hart_index2id[0], [1], [2], ...を順に調べる★★
	add	s9, s9, 4
	add	a4, a4, 1
	blt	a4, s7, 1b
	//★★s6 = hartindex
2:	add	s6, a4, zero
	//★★hartindexがhart数を超えているか?
	//★★  超える  : CPUが無効である、サブCPUを起動しない -> _start_hangへ
	//★★  超えない: CPUが有効である、サブCPUを起動する -> ブランチ命令の先へ
3:	bge	s6, s7, _start_hang

	//...
OpenSBIのロゴが出たあたりでブレークして各スレッドの実行している関数名を見ると、下記のようになります。
無効なCPU 2が_start_hang()で止まっている様子
(gdb) info thr
  Id   Target Id                    Frame
  1    Thread 1.1 (CPU#0 [halted ]) sbi_hsm_hart_wait (scratch=0x8008c000, hartid=0)
    at opensbi/lib/sbi/sbi_hsm.c:177
  2    Thread 1.2 (CPU#1 [running]) 0x0000000080020ffe in fdt32_to_cpu (x=50331648)
    at opensbi/lib/utils/libfdt/libfdt_env.h:57
* 3    Thread 1.3 (CPU#2 [halted ]) _start_hang ()
    at opensbi/firmware/fw_base.S:409
  4    Thread 1.4 (CPU#3 [halted ]) sbi_hsm_hart_wait (scratch=0x80088000, hartid=3)
    at opensbi/lib/sbi/sbi_hsm.c:177
Thread Id 3つまりCPU 2(※)だけ_start_hang()に居ることがわかりますね。
(※)GDBのThread Idは1スタートなのでThread Id 1, 2, 3, 4がCPU 0, 1, 2, 3に相当します。
コメント一覧
- コメントはありません。
 この記事にコメントする
2024年9月20日
Java - まとめリンク
目次: Java
- JavaのGUIライブラリSwingの本を買いました
- Swingでウインドウ表示
- EclipseでJavaを書いてみようかな
- 3倍速く時が進むJavaプログラム
- JavaのGenericsとcloneメソッド
- JDKのソースコードは参考になる
- Javaでビットフィールドはできなさそう
- Eclipseが固まる
- Java SEのAPIドキュメント
- Javaのリフレクションとコンストラクタ
- Scalaの中間記法の優先度
- Javaのイテレータ
- Javaのabstractはどこに書く?
- Javaのhprofプロファイラ
- Javaの継承と委譲
- IntelliJ IDEA 14の自動インデント
- IntelliJ IDEAのデバッガと巨大なリスト
- C++とJavaの外部イテレータ
目次: 一覧の一覧
コメント一覧
- コメントはありません。
この記事にコメントする
2024年9月17日
Yoctoの並列Fetchでエラーが起きるとき
目次: Yocto
Yoctoは特に何も指定せずにビルドすると全スレッドを使おうとします。この挙動はコンパイルだけでなくFetchでも同様のようです。最近のCPUは一般向けでも8〜16スレッドが珍しくないので、何も考えずにbitbakeを実行すると16接続同時にFetchを試みて、サーバー側の同時接続数制限か何かに引っかかってエラーで落ちます。
このエラーが鬱陶しくて困っていたのですが、並列数を2〜4程度(サーバーに蹴られない接続数)に制限して、最初にFetchだけ実行してしまうとよさそうです。
並列数を2に制限してFetchのみ実行
BB_NUMBER_THREADS=2 bitbake core-image-sato --runall=fetch
一度Fetchが終わればその後はFetchしませんから、並列数を16でも32でも好きな数にして良いです。
コメント一覧
- コメントはありません。
この記事にコメントする
2024年9月14日
OpenSBIを調べる - scratch領域の詳細
目次: Linux
今回はOpenSBIのコード内に頻出するscratch領域について調べます。OpenSBI内で設定値を格納するために何かと登場するscratch領域ですが、hartごとに用意されている領域であることくらいしか知りません。具体的にどこに配置されるのか?どんな領域があるのか?を調べます。
まずscratch領域の場所を調べましょう。アセンブラで書かれている_hartid_to_scratch()関数を読み解くのがわかりやすいでしょう。
scratch領域のアドレスを得るコード
// opensbi/lib/sbi/sbi_scratch.c

int sbi_scratch_init(struct sbi_scratch *scratch)
{
	u32 i, h;
	const struct sbi_platform *plat = sbi_platform_ptr(scratch);

	for (i = 0; i < plat->hart_count; i++) {
		h = (plat->hart_index2id) ? plat->hart_index2id[i] : i;
		hartindex_to_hartid_table[i] = h;
		//★★scratch領域の先頭アドレスはhartindex_to_scratch_table[]に保存されている★★
		hartindex_to_scratch_table[i] =
			((hartid2scratch)scratch->hartid_to_scratch)(h, i);
	}

	last_hartindex_having_scratch = plat->hart_count - 1;

	return 0;
}


// opensbi/firmware/fw_base.S

	.globl _hartid_to_scratch
_hartid_to_scratch:
	/*
	 * a0 -> HART ID (passed by caller)
	 * a1 -> HART Index (passed by caller)
	 * t0 -> HART Stack Size
	 * t1 -> HART Stack End
	 * t2 -> Temporary
	 */
	lla	t2, platform
#if __riscv_xlen > 32
	lwu	t0, SBI_PLATFORM_HART_STACK_SIZE_OFFSET(t2)
	lwu	t2, SBI_PLATFORM_HART_COUNT_OFFSET(t2)
#else
	lw	t0, SBI_PLATFORM_HART_STACK_SIZE_OFFSET(t2)
	lw	t2, SBI_PLATFORM_HART_COUNT_OFFSET(t2)
#endif
	sub	t2, t2, a1    /* hart数 - hart indexに */
	mul	t2, t2, t0    /* スタックサイズを掛ける */
                              /* index 0が末尾側、index 1が末尾の1つ手前となる */
	lla	t1, _fw_end   /* OpenSBIバイナリの終端、メモリマップを参照 */
	add	t1, t1, t2    /* _fw_endの後ろがスタック領域 */
	li	t2, SBI_SCRATCH_SIZE    /* 現状はSBI_SCRATCH_SIZE = 0x1000 */
	sub	a0, t1, t2    /* スタック領域の末尾がscratch領域 */
	ret
コードを見る限り、scratch領域の場所を知るにはhartindexが必要です。hartindexはhartに関係する何かの配列のindexに使う値です。0〜hart数 - 1の値を取ります。
なぜhartidをindex代わりにしないのか?理由はRISC-Vのhartidがindex値として適していないからです。hartidは0から始まる連続した値とは限らず、非連続でも構いませんし、非常に大きな値をとっても構いません(推奨はされませんが)。そのためhartindexのような別概念を持ち出す必要があります。ちなみにhartindexとhartidの関係はhartindex_to_hartid_table[]に保持されています。
例えばhart数4、hartindex 0だとしますと、スタック領域はhart数分つまり4つあります。scratch領域の先頭は
(4 - 0) * hart_stack_size - SBI_SCRATCH_SIZE
なので、4つ目のスタック領域の末尾 - 0x1000です。図示したほうがわかりやすいでしょう。
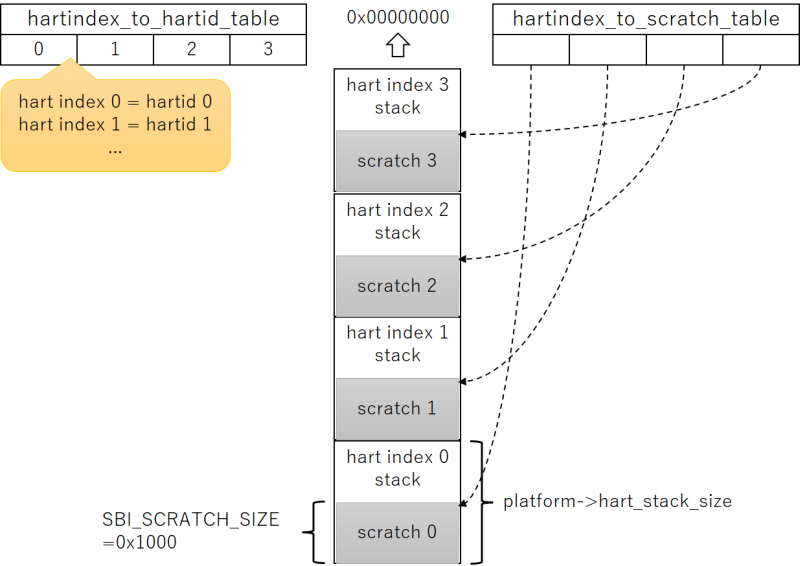
アドレスの高位側からhartindex 0, 1, 2, ...用のスタックおよびscratch領域が並んでいて、hartindex_to_hartid_table[]にhartindexとhartidの関係が保存されており、hartindex_to_scratch_table[]にhartindexとscratch領域の先頭アドレスの関係が保存されています。
scratch領域の中身
以上でscratch領域の場所はわかりました。次は領域の内部を調べましょう。コードを見るとscratch領域は2つの機能があります。
- 先頭にstruct sbi_scratchが存在
- 以降はsbi_scratch_alloc_offset()関数で確保するための領域
先頭に構造体があって、その後の領域はOpenSBI内で自由に確保して使う方式です。領域の確保にはsbi_scratch_alloc_offset()関数を使用します。コードはこんな感じ。
scratch領域にメモリを確保するコード
// opensbi/lib/sbi/sbi_scratch.c

unsigned long sbi_scratch_alloc_offset(unsigned long size)
{
	u32 i;
	void *ptr;
	unsigned long ret = 0;
	struct sbi_scratch *rscratch;

	/*
	 * We have a simple brain-dead allocator which never expects
	 * anything to be free-ed hence it keeps incrementing the
	 * next allocation offset until it runs-out of space.
	 *
	 * In future, we will have more sophisticated allocator which
	 * will allow us to re-claim free-ed space.
	 */

	if (!size)
		return 0;

	size += __SIZEOF_POINTER__ - 1;
	size &= ~((unsigned long)__SIZEOF_POINTER__ - 1);

	spin_lock(&extra_lock);

	if (SBI_SCRATCH_SIZE < (extra_offset + size))
		goto done;

	//★★extra_offsetは最初struct sbi_scratchの末尾を指している★★
	//★★sbi_scratch_alloc_offset()が成功するたびに高位側のアドレスにズレていく★★
	ret = extra_offset;
	extra_offset += size;

done:
	spin_unlock(&extra_lock);

	if (ret) {
		for (i = 0; i <= sbi_scratch_last_hartindex(); i++) {
			rscratch = sbi_hartindex_to_scratch(i);
			if (!rscratch)
				continue;
			ptr = sbi_scratch_offset_ptr(rscratch, ret);
			sbi_memset(ptr, 0, size);
		}
	}

	return ret;
}
柔軟で面白い仕組みですがscratch領域内に保存された情報がどこにあるか分かりづらく、コードを読む側としては嫌な作りとも言えます。下記の図にscratch領域にメモリを確保するとどうなるか?を示します。
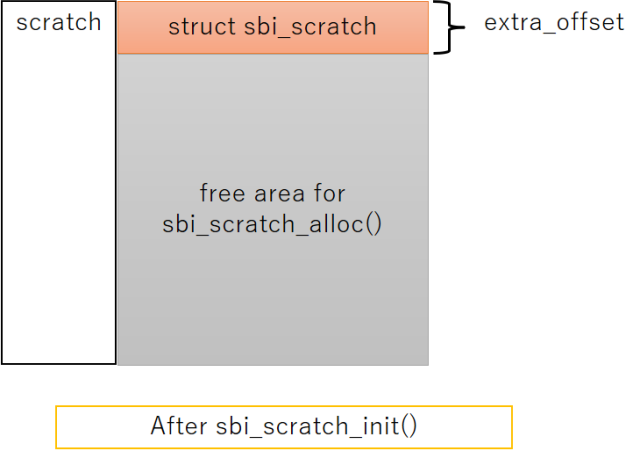
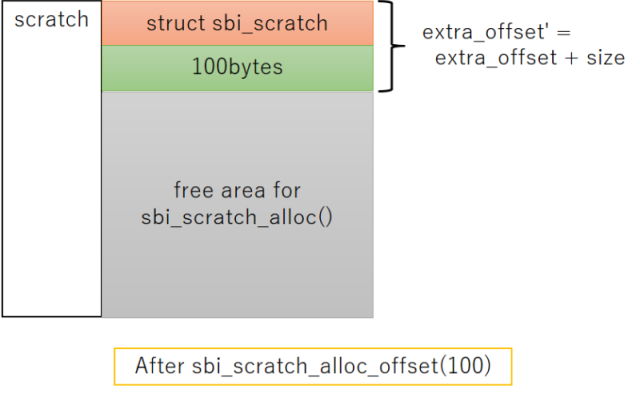
初期状態と100バイトのメモリ確保を行った後で、scratch領域のメモリマップとextra_offsetが高位側のアドレスにズレる様子を表しました。
scratch領域にメモリを確保する人たち
実際にはたくさんの領域が確保されます。下記はsbi_scratch_alloc_offset()を呼んでscratch領域にメモリを確保し、どんな種類のデータを何バイト確保しているか?の一覧表です。
| offsetを保存する変数名 | データ型 | サイズ |
|---|---|---|
| domain_hart_ptr_offset | pointer | 8 |
| entry_count_offset | pointer | 8 |
| init_count_offset | pointer | 8 |
| hart_data_offset | struct sbi_hsm_data | 56 |
| hart_features_offset | struct sbi_hart_features | 40 |
| fdt_isa_bitmap_offset | unsigned long[1] ※要素数=hart数 / 64 | 8 |
| shs_ptr_off | pointer | 8 |
| sse_inject_fifo_off | struct sbi_fifo | 24 |
| sse_inject_fifo_mem_off | struct sse_ipi_inject_data[5] | 20 |
| phs_ptr_offset | pointer | 8 |
| hart_state_ptr_offset | pointer | 8 |
| plic_ptr_offset | pointer | 8 |
| plic_mcontext_offset | long | 8 |
| plic_scontext_offset | long | 8 |
| ipi_data_off | struct sbi_ipi_data | 8 |
| mswi_ptr_offset | pointer | 8 |
| tlb_sync_off | atomic_t | 8 |
| tlb_fifo_off | struct sbi_fifo | 24 |
| tlb_fifo_mem_off | pointer | 8 |
| time_delta_off | u64 | 8 |
| mtimer_ptr_offset | pointer | 8 |
| fwft_ptr_offset | pointer | 8 |
表の1列目はsbi_scratch_alloc_offset()の返り値を保存している変数名です。hart_features_offsetを例にして、領域の確保を行っているコードと、領域のアドレスを取得するコードを見ましょう。
scratch領域の確保と参照をしているコードの例
// opensbi/lib/sbi/sbi_hart.c

int sbi_hart_init(struct sbi_scratch *scratch, bool cold_boot)
{
	int rc;

	/*
	 * Clear mip CSR before proceeding with init to avoid any spurious
	 * external interrupts in S-mode.
	 */
	csr_write(CSR_MIP, 0);

	if (cold_boot) {
		if (misa_extension('H'))
			sbi_hart_expected_trap = &__sbi_expected_trap_hext;

		//★★scratch領域に領域を確保する方法★★
		//★★領域を確保して、scratch領域先頭からのオフセットアドレス(=返り値)を★★
		//★★hart_features_offsetに保存★★
		hart_features_offset = sbi_scratch_alloc_offset(
					sizeof(struct sbi_hart_features));
		if (!hart_features_offset)
			return SBI_ENOMEM;
	}

	rc = hart_detect_features(scratch);
	if (rc)
		return rc;

	return sbi_hart_reinit(scratch);
}

bool sbi_hart_has_extension(struct sbi_scratch *scratch,
			    enum sbi_hart_extensions ext)
{
	//★★scratch領域に確保した領域を参照する方法★★
	struct sbi_hart_features *hfeatures =
			sbi_scratch_offset_ptr(scratch, hart_features_offset);

	if (__test_bit(ext, hfeatures->extensions))
		return true;
	else
		return false;
}
端的に言うと領域の確保にsbi_scratch_alloc_offset()関数、領域の参照にsbi_scratch_offset_ptr()関数を使えば良いです。
複数hartの場合は問題ない?
結論から言うと問題は起きません。領域確保時と領域参照時に分けて考えましょう。
最初にscratch領域のメモリを確保する場合です。これは単純で、初期化を担当する1つのhartだけがscratch領域のメモリ確保を行えば、同じ領域をダブって確保してしまう問題は発生しません。
次にscratch領域を参照する場合です。全てのhartが同じオフセットを使用すれば、重なったりはみ出たりする問題は発生しません。例えばsbi_scratch_alloc_offset()関数で確保したメモリ領域Aがありサイズ16、オフセット120だとしたら、全hartのscratch領域にメモリ領域Aが存在していて、同じサイズとオフセットであるとみなします。全hartのscratch領域の大きさが同じだからできる芸当ですね。
これで謎に包まれたOpenSBIのscratch領域も多少は晴れたはずです。たぶん……。
コメント一覧
- コメントはありません。
この記事にコメントする
| < | 2024 | > | ||||
| << | < | 09 | > | >> | ||
| 日 | 月 | 火 | 水 | 木 | 金 | 土 |
| 1 | 2 | 3 | 4 | 5 | 6 | 7 |
| 8 | 9 | 10 | 11 | 12 | 13 | 14 |
| 15 | 16 | 17 | 18 | 19 | 20 | 21 |
| 22 | 23 | 24 | 25 | 26 | 27 | 28 |
| 29 | 30 | - | - | - | - | - |
最近のコメント5件
最近の記事20件
-
 26年4月7日
すずき (04/07 23:02)
「[ジャガーさんのエンジンオイル交換] 目次: 車買ってから6,000kmくらい走ったのでエンジンオイル&オイルフィルターを交換...」 -
23年5月15日
すずき (04/07 21:52)
「[車 - まとめリンク] 目次: 車三菱 FTO GPX '95の話。群馬県へのドライブ1群馬県へのドライブ2将来車を買い替え...」 -
26年2月8日
すずき (04/07 21:51)
「[ジャガーさんの修理……のはずが雪] 目次: 車以前(2025年11月21日の日記参照)、ジャガー...」 -
26年4月4日
すずき (04/07 21:51)
「[ジャガーさんのワイパー交換] 目次: 車以前からジャガーのワイパーは中央部分だけ拭き取れておらず、前が見づらかったです。最近...」 -
26年4月5日
すずき (04/07 00:04)
「[ドラクエ2リメイク、トロフィーコンプ] 目次: ゲームSteamで買ったドラクエ1&2 HDリメイク、ついにドラクエ2もトロ...」 -
21年12月28日
すずき (04/05 16:38)
「[ゲーム - まとめリンク] 目次: ゲームNintendo DSを買ったパネルでポンDS最近の朝はパネポンDS聖剣伝説DSチ...」 -
26年3月20日
すずき (03/26 01:31)
「[Upload Labs、トロフィーコンプ] 目次: ゲーム先月、Upload Labsのトロフィーをコンプリートしましたが、...」 -
26年3月6日
すずき (03/19 02:54)
「[CRCの計算その2 - 最上位ビットの省略] 目次: ベンチマーク前回、CRCの筆算とMSBに寄せていくCRCの計算方法を紹...」 -
21年5月22日
すずき (03/19 02:54)
「[ベンチマーク - まとめリンク] 目次: ベンチマーク色々なベンチマーク、コードゴルフ。USB HDD RAIDのベンチマー...」 -
26年3月2日
すずき (03/19 02:53)
「[CRCの計算その1 - 筆算] 目次: ベンチマーク令和の時代に今更ですがCRCについて調べてました。CRCのベースになる数...」 -
26年3月10日
すずき (03/13 00:54)
「[誕生日] 43歳になりました。昨年の日記(2025年3月10日の日記参照)を見ると、転職して半年というのもあって通勤の話をし...」 -
22年4月13日
すずき (03/12 23:48)
「[C言語とlibc - まとめリンク] 目次: C言語とlibcC言語について。C++言語もたまに。プログラムの落とし穴、演算...」 -
07年11月1日
すずき (03/12 23:47)
「[netcatとsigned charとunsigned char] 目次: C言語とlibcGNU netcat 0.7.1...」 -
20年10月23日
すずき (03/12 23:32)
「[ARM - まとめリンク] 目次: ARMROCK64のブート、オーディオ。ROCK64購入ROCK64とU-Bootのdi...」 -
18年7月21日
すずき (03/12 23:31)
「[Bluetooth UART変換] 目次: ARMUARTをBluetoothに変換してくれるHC-06(モジュールの販売サ...」 -
02年11月22日
すずき (03/12 23:28)
「[ハフマン符号化プログラム] 目次: ベンチマークハフマン符号化プログラムですが、メモリ節約バージョンが完成しました。技術が足...」 -
22年11月11日
すずき (03/12 23:26)
「[手動の最適化 対 コンパイラの最適化] 目次: ベンチマークポッキーの日だそうですが、1(と0)といえば2進数、2進数といえ...」 -
07年11月2日
すずき (03/12 23:25)
「[ビット演算の極み(ハッカーのたのしみ)] 目次: ベンチマーク今日はコードを2つ紹介(出典: ハッカーのたのしみ, Henr...」 -
23年4月10日
すずき (03/12 23:18)
「[Linux - まとめリンク] 目次: Linuxカーネル、ドライバ関連。Linux kernel 2.4 for ARMが...」 -
15年11月22日
すずき (03/12 23:17)
「[自作エミュレータに外の世界とのI/Oを付けたい] 目次: Linux自作エミュレータに外部とのアクセス手段を足そうと思い、A...」
こんてんつ
wiki Linux JM Java API過去の日記
2002年 2003年 2004年 2005年 2006年 2007年 2008年 2009年 2010年 2011年 2012年 2013年 2014年 2015年 2016年 2017年 2018年 2019年 2020年 2021年 2022年 2023年 2024年 2025年 2026年 過去日記についてその他の情報
アクセス統計 サーバ一覧 サイトの情報
合計:
本日:
